I’ve posted an updated version of this review here. This content originally appeared on Reddit on June 19th, 2021.
I’ve been waiting on the release of this light for months. I knew it’s what I wanted even before it was announced. Get comfy because this is going to be a long and thorough review.
The Boring Stuff
I purchased this light from the official product page on Convoy’s Aliexpress store. My order took 19 days to arrive using the free shipping option, which is shorter than expected but is still a long time.
I purchased the version without batteries, but you should buy the version with batteries because it’s a much better value than buying batteries separately. There’s also a Cree XHP70.2 version which has several color temps available and will be much less throwy than the SBT90.2 version shown here. u/Zeroair did an awesome review of that version which heavily influenced my decision to choose the 4X18A as my first big, multi-cell light. I really hope Simon releases a version in the future with a GT-FC40 emitter as well.
Below are the official specs.
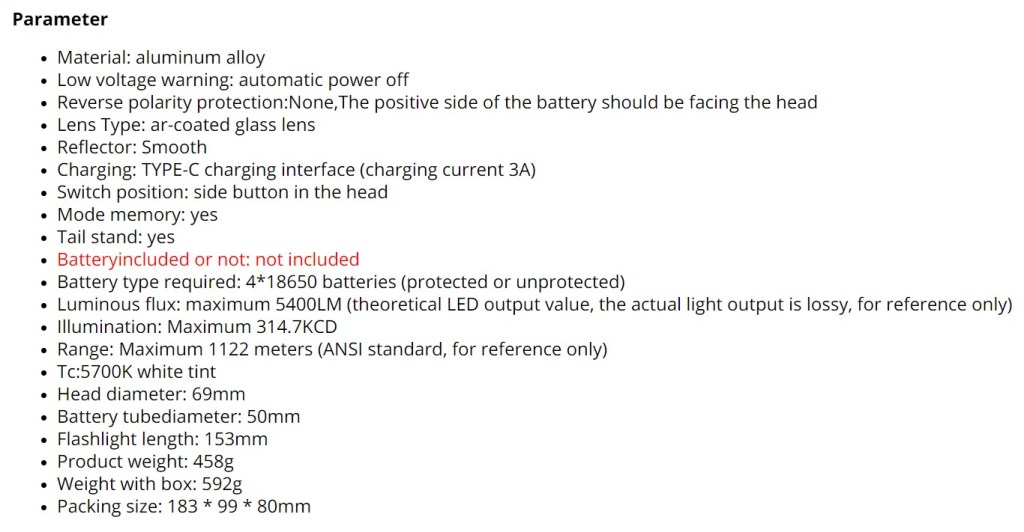
What comes in the box?

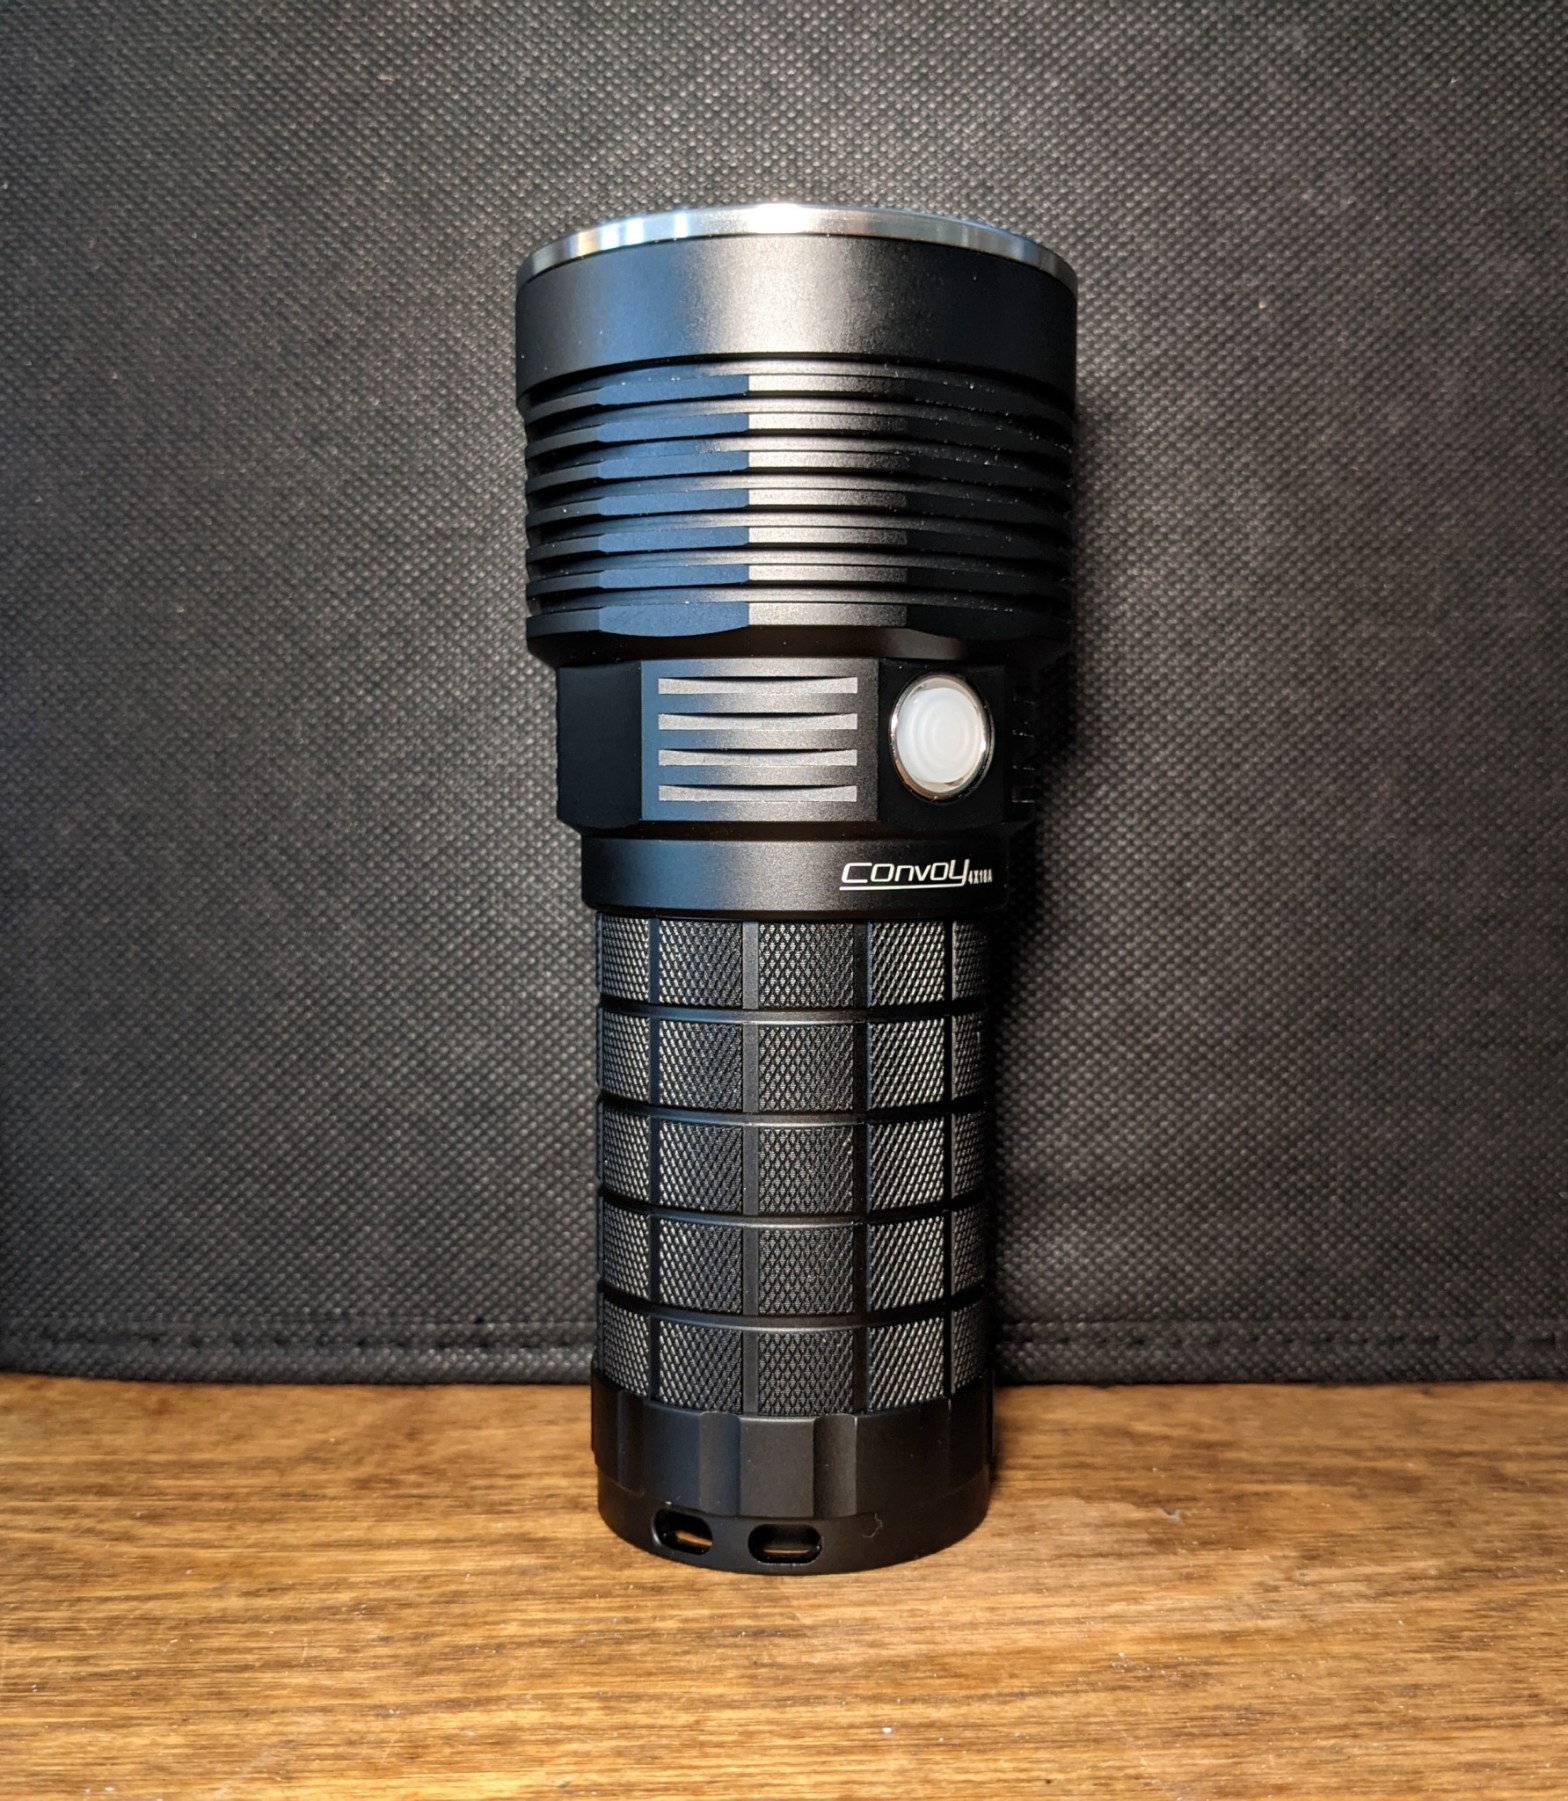
The 4X18A comes in the sturdy two-piece thick-brown-cardboard box, typical of Convoy’s larger models. The only marking is a sticker on the end that says “4X18A SBT90.2”. There’s very nice open cell foam padding on the inside with cutouts for your fingers.
There are no loose accessories or paperwork inside the box. There’s no manual, no lanyard, no charging cable, just the flat top battery adapter that comes inside the light so the box is super clean. I think omitting the charging cable is a bit odd, but I don’t mind it. Lots of people already have USB-C cables lying around, and even if you don’t, they are not hard to get.
I love this packaging. It’s clear that Simon only spent money where it counts. There aren’t any accessories you won’t use, no printed manual that you could easily just look up online, no flashy printing on the box to make it appealing to in-store shoppers, and no magnets or fancy mechanisms to “improve the unboxing experience”. I wish every product bought online came in a box like this. It’s also sturdy enough that you could easily remove the foam and repurpose the box to hold whatever you want.
I wouldn’t mind if the belt holster was included though.
Size & Dimensions

Convoy Z1, Convoy 4X18A, Sofirn BLF LT1, Noctigon KR1, Emisar D4V2
| Measurement | Official (mm) | Measured (mm) | Converted (in) |
|---|---|---|---|
| Head/Bezel Diameter | 69 | 69 | 2.72 |
| Neck width (at flats) | Not specified | 57 | 2.24 |
| Maximum depth of cooling fins | Not specified | 3 | 0.12 |
| Space around USB port | Not specified | 6.9 x 12.9 | 0.27 x 0.5 |
| Body tube diameter | 50 | 50 | 1.97 |
| Tailcap diameter | Not specified | 51.5 | 2.03 |
| Tailcap channel width | Not specified | 4.5 | 0.18 |
| Tailcap channel depth | Not specified | 7.2 | 0.28 |
| Tailcap cavity diameter | Not specified | 32 | 1.26 |
| Tailcap cavity depth | Not specified | 4.8 | 0.19 |
| Bezel inside diameter | Not specified | 60 | 2.36 |
| Lens depth in bezel | Not specified | 7.8 | 0.31 |
| Lens diameter | Not specified | 63 | 2.48 |
| Lens thickness | Not specified | 2.5 | 0.1 |
| Reflector diameter | Not specified | 60.7 | 2.39 |
| Reflector height | Not specified | ~35 | ~1.38 |
| Reflector hole diameter | Not specified | 13.35 | 0.53 |
| MCPCB size | 25 | 25 | 0.98 |
| Button diameter | Not Specified | 10.5 | 0.41 |
| Button protrusion | Not Specified | 1 | 0.04 |
| Length | 153 | 153 | 6.02 |
| Box Length | 183 | 184 | 7.24 |
| Box Width | 99 | 99 | 3.9 |
| Box Height | 80 | 80 | 3.15 |
Weight: 652g / 23.0oz with four Sanyo NCR18650GA batteries and no flat top adapter
User Interface
I have a few minor nitpicks but overall this UI is fine and on-par with most e-switch UI’s.
| State | Action | Result |
|---|---|---|
| Off | Click | On (mode memory, except moonlight) |
| Any (except momentary & lockout) | Double Click | Turbo (memorized) |
| Off | Hold | Moonlight (not memorized) |
| Any (except momentary & lockout) | Triple Click | Strobe |
| Off | Click 4x | Momentary mode |
| Momentary | Hold | Momentary Turbo until button released |
| Momentary | Click 4x | Off |
| Off | Click 5x | Voltage readout |
| Off | Click 6x | Toggle smooth/stepped ramp |
| Off | Click 10x | Lockout |
| Lockout | Click 10x | Unlock to off |
| On (except momentary & lockout) | Click | Off |
| Lockout | Click | One low blink |
| Lockout | Hold | One low blink per second until button released |
What I like:
- the shortcuts to moonlight and turbo
- the fact that moonlight isn’t memorized
- the ability to switch between a smooth & stepped ramp
- strobe is behind a triple click
- voltage readout (I love this)
The nitpicks (what I don’t like):
- Turbo should not be memorized, just like moonlight mode isn’t. There’s a dedicated shortcut for it so it doesn’t need to be saved into mode memory.
- There’s no way to get from moonlight to low. I want a hold-from-moonlight to start cycling up the main modes. As it is now, unless you have it memorized, the only way to get to low is by turning the light on to turbo (or the memorized mode) and cycling/ramping to low.
- In momentary mode there’s a noticeable delay between pressing the switch and the light turning on
- 10 clicks seems excessive for electronic lockout. Fortunately, mechanical lockout works great.
None of my issues with this UI are deal breakers by any means. But, as always, Anduril would be better and would solve all my nitpicks with the UI. A lot of people say “Anduril doesn’t make sense on a thrower” but I’d rather all my lights have the same awesome UI, even if I don’t utilize all the features of it on every single light.
Modes & Outputs
I don’t have a good way of measuring lumens. Officially, the 4X18A SBT90.2 is rated at 5400 lumens and I’ll be assuming that to be correct for all my lumen estimates. In reality, there are some losses in the reflector and lens, so the actual lumen output is probably in the 4500-5000 lumen range, but I can’t confirm that estimate. All tests were performed using my phone’s built in lux meter, the ceilingbounce app, and my diy integrating box, so take all my measurements with a grain of salt.
| Mode | Lux Measured | Relative Output (Calculated) | Lumens (Calculated) | Current (milliamps) |
|---|---|---|---|---|
| Turbo (100%) | 13200 | 100% | 5400 | Not measured |
| High (40%) | 5200 | 39 | 2106 | Not measured |
| Medium (10%) | 2050 | 16 | 864 | 1950 |
| Low (1%) | 170 | 1.3% | 70.2 | 160 |
| Moonlight (0.2%) | 82 | 0.6% | 32 | 80 |
Candela & Throw: Officially this light is rated at 314.7kcd and 1122 meters of throw. I measured 337kcd or 1,161m of throw. That is certainly within the margin of error for my testing setup so I’d say the official throw rating is accurate.
Regulation
| Battery Voltage | Lux Measured | Relative Output (Calculated) | Lumens (Calculated) |
|---|---|---|---|
| 4.2 | 13200 | 100 | 5400 |
| 4.05 | 12200 | 92 | 4968 |
| 3.85 | 12200 | 92 | 4968 |
| 3.7 | 11400 | 86 | 4644 |
| 3.43 | 8400 | 64 | 3456 |
| 3.29 | 6600 | 50 | 2700 |
| 3.15 | 5400 | 41 | 2214 |
| 2.92V | 2500 | 19 | 1026 |
Regulation here is average. Output starts to dip significantly when the cells get low. The runtimes are pretty flat though, which is great.
Runtime

Turbo: Turbo lasts for just under 1 minute before beginning to step down in a small steps over the course of another minute or so. It settles at just over 2500 lumens for the next several minutes. There are a couple more minor stepdowns over the course of the runtime but it stays over 2250 lumens for just shy of two hours when there is a hard stepdown to moonlight mode. From there, moonlight lasts until just before the none and one half hour mark.
High: Looks similar to turbo, just without the initial 3 minute turbo blip and the brightness hovers around the 2000 lumen mark. This mode is perfect if you don’t want any significant stepdown and you get some really phenomenal brightness for over two hours before the low voltage stepdown to moonlight. On high mode, the moonlight stepdown lasts until the six and a half hour mark.
Medium: Medium starts out around 900 lumens and displays a slow and slight drop to about 800 lumens over the course of half an hour. That brightness lasts a whopping six and a half hour before the low voltage stepdown kicks in. Then, moonlight mode lasts until the 10 hour mark. Notably, this mode is a lot more jagged than the higher two modes. The brightness fluctuations are not visible to the eye though, just to my phone’s lux meter.
Low: I started a low mode test, but after 34 hours it was only down to 3.8 volts and I didn’t feel like letting it run for another three days so I stopped the test. I observed the same brightness fluctuation in low mode that I observed in medium mode, but once again it wasn’t visible to the eye.
In each mode, when the low voltage stepdown kicked in, the light switch to moonlight mode. I observed that this moonlight mode lasted for longer on higher modes and I believe that was caused by voltage sag in the batteries when under the higher loads, causing the low voltage stepdown to kick in earlier. Regardless, in every mode I tested, moonlight lasted for a few hours so even if your batteries run low in an emergency you will still have a few hours of great usable light left.
When I ended the Turbo runtime, the light had already been shut off for a few minutes thanks to the LVP (Low Voltage Protection) and I measured the cells at 2.92V. When turning the light back on after this test, I observed a low voltage warning in the form of the switch blinking red. It’s not as obvious as the main emitter blinking, but the switch backlight is quite bright so it will be hard to miss.
Emitter & Beam

This version of the 4X18A uses the spectacular Luminus SBT90.2 in a 5700K color temperature. This emitter is truly special because it combines the massive brightness you get from something like an Cree XHP70.2 with the intensity and throw that you get from some of Osrams White Flat emitters. It’s just phenomenal. It’s a really cool looking emitter too.
I have no idea why the anodizing looks weird inside the head, but it doesn’t affect anything and you can’t see it unless you take the reflector out.
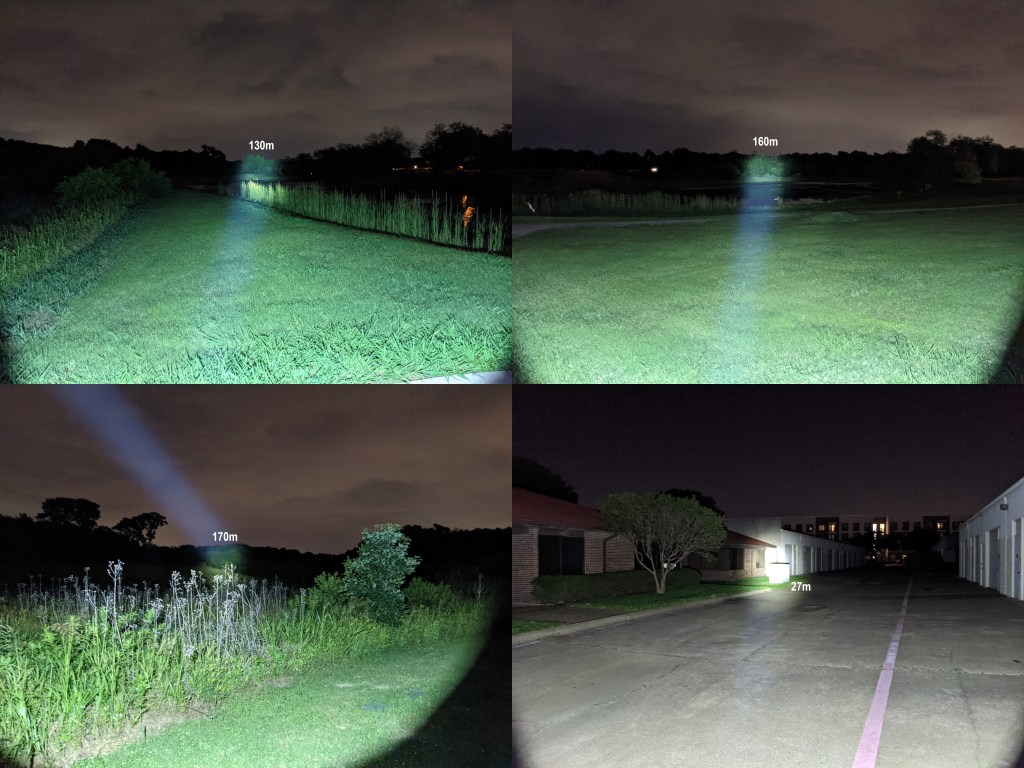
Here are some outdoor beamshots showing this light by itself. The distances of the objects in the hotspot are marked in the photos. It’s a fairly tight beam, but not to the point that it’s not all that useful like an LEP. The spill is wide and bright. You can see everything around you and objects several hundred meters away.

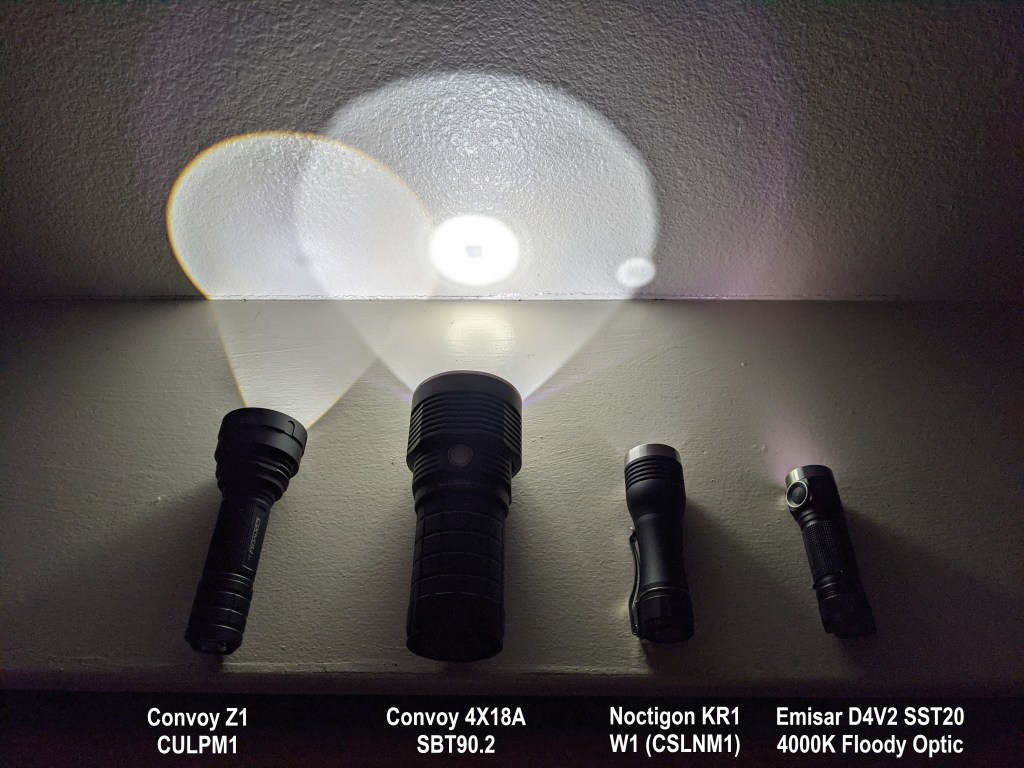
Here are some comparisons with a few different lights. Thanks to u/calmlikea3omb and u/jonfromm for hanging out at the North Texas Flashlight Meetup so I could take some of these! The beam profiles of the 4X18A and K1 SBT are nearly identical which is pretty cool. The MT90 naturally just wipes the floor with the 4X18A, but it also costs several times as much. The KR1vn has a significantly wider hotspot but is much more portable thanks to its small size. u/mezekaldon posted this awesome beamshot comparison between his 4X18A SBT and a couple other comparable lights that I talk about in the competition section.
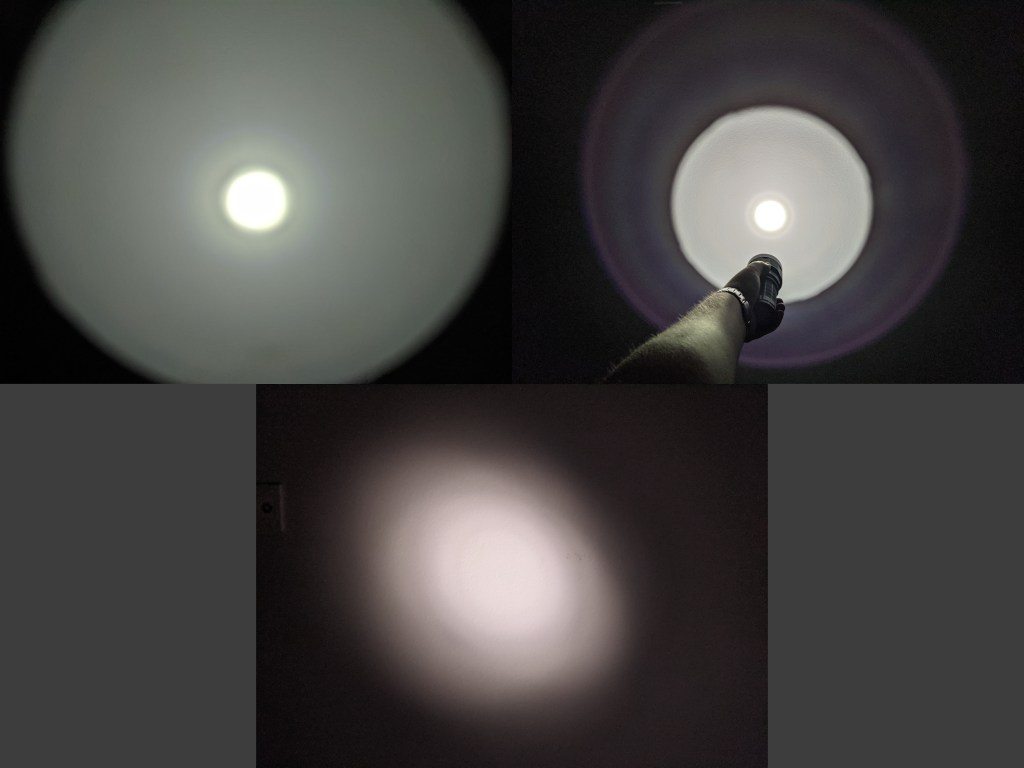
Here are a few indoor beamshots on a white wall. The main beam is fairly clean and centering isn’t too bad. There is definitely a purple halo around the spill from the antireflective coating on the lens, but it’s not noticeable in normal use. These photos exaggerate colors and brightness differences a fair bit.
Moonlight is a bit of a misnomer here. It’s about 30 lumens. I wouldn’t mind having an actual sub-lumen mode, but this is not really a light for sneaking around the house at night without waking the kids so I don’t really mind the fact that the lowest mode is so bright.
Construction & Design

The build here is pretty great. All the machining and anodizing feel great. The threads are square cut, but could probably stand a little more lubricant. O rings are nice and thick. It feels solid in hand and it’s pretty heavy. It’s not a particularly stylized light so it might look a little boring. I like that though, as it looks utilitarian. The knurling is great, being grippy but not aggressive. The head is covered in numerous but shallow fins.

The tailcap just serves as a cover for the PCB that holds all the springs in place at the end of the body tube. It’s wide and flat. That combined with most of the weight of the light being in the battery tube makes tailstanding extremely stable. Interestingly though, it’s got a fairly large cavity inside which would be perfect for a big magnet like this one. That wouldn’t be super useful on a light with such a tight beam, but I could see that being pretty handy on one of the XHP70.2 4X18A’s. You probably wouldn’t even have to glue it. The cavity exists to allow plenty of space on the outside of the tailcap for the big lanyard holes and space behind them. Adding this extra length just for a lanyard would bug me on a small light, but on a big light like this I could actually see a lanyard being handy, and it doesn’t add that much length relative to the big light.
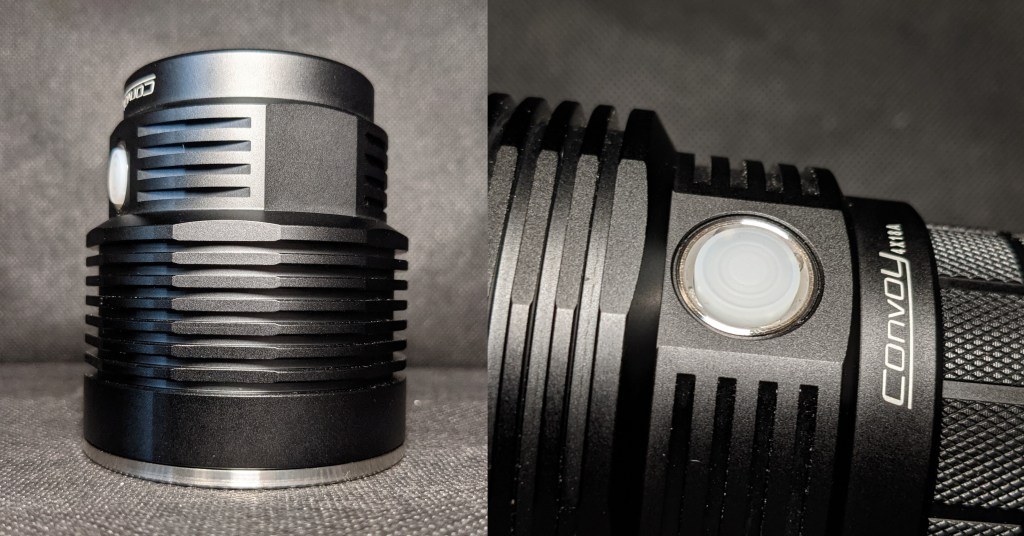
The 4X18A uses an electronic side switch. The boot is translucent white rubber, which allows the red and green backlighting to shine through while the light is charging or when the battery is low (pics of that in the batteries & charging section). It would have been cool if it stayed lit all the time though. Maybe include RGB LED’s and Anduril in a future version, Simon? It’s plenty easy to find even in the dark because it feels substantially different from the rubber charging port cover or from the other flat areas on that section of the light. It’s plenty tactile and clicky. The switch sits about 1mm proud of the body of the light, which helps make it easy to find and easy to press. Notably though, you have to press on the center of the switch to get it to click. That combined with the wider part of the head partially protecting it means that accidental activation is actually relatively unlikely here. I still like to use the electronic or mechanical lockout when putting it in a bag though. Overall it’s a good switch and I’m satisfied with it.

The 4X18A uses a large screw in 40mm driver. It’s super easy to remove since it’s just held in with two screws, but there are several wires coming off of it: two thick ones for the emitter, and four thin ones for the switch. A driver swap here should be relatively easy and there’s tons of space in the driver cavity. The tail PCB is held in with four screws that aren’t of particularly high quality as the threads can strip super easily. I would avoid removing this if you have to. The springs are just single springs with no bypass but they are fairly large and thick. If you wanted to do a spring bypass here it would be super easy. I was surprised to see that the aluminum under the tail PCB is anodized, so the screws are what transfer the current into the aluminum body. If you do a spring bypass, it would probably be good to gently remove the anodizing from where the PCB sits as well to assure as little resistance as possible.
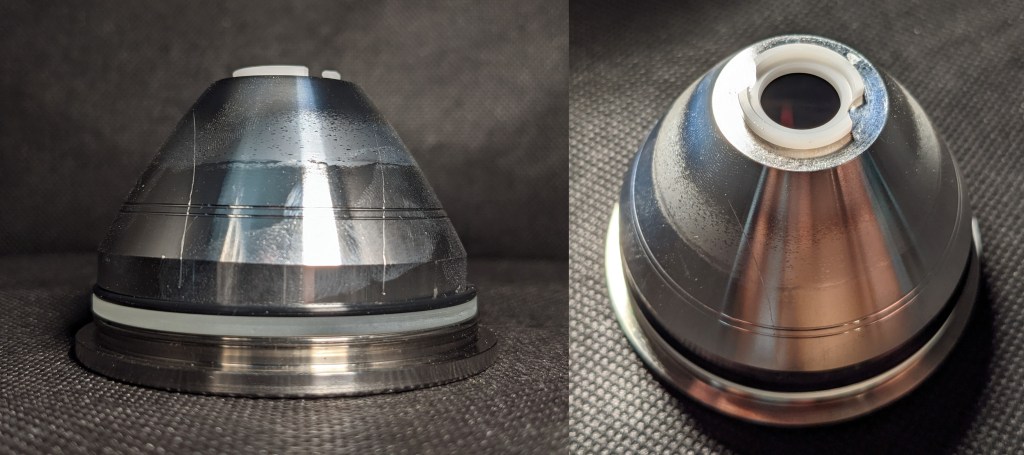
This has a pretty large reflector for a can light. It uses the same one-o-ring solution from some of Convoy’s other lights like the M21C and M1, but I think it’s better implemented here than on the M1. I’m not concerned about its water resistance. The centering ring is unique in that the back of it is wider than the front, so it actually sits partially over the emitter place and not just around it like most centering rings do. This was a clever way to use a reflector designed for a 7070 emitter with the SBT90.2 which has an even larger footprint.
If I had the opportunity to change the design of the 4X18A, there are only few things I would change. First, I would add tripod mounting threads to one of the flats on the side of the head and also to the center of the tailcap, just like the BLF LT1, to provide some potential mounting options. Secondly, I would add just a little bit more material inside the battery tube to hold an individual cell in place securely. You can use a single cell, but it’s easy for the cell to fall into one of the other cell’s slots if you aren’t careful when threading on the battery tube. Thirdly, I would taper the inside of the head to allow for deeper cooling fins on the outside to help shed heat from that power hungry SBT90.2 emitter. Finally, I would improve the screws & threading for the tailcap PCB.
Carry & Ergonomics

The 4X18A feels great in hand. It feels dense. The knurling provides enough grip without being aggressive. Because of the large size, I find that the switch is pretty easy to actuate with different fingers in a variety of grips. There’s the obvious normal forward grip with your thumb on the button shown in the middle photo and that’s what I do most of the time. That doesn’t allow me to wrap my thumb around the light though, so when I need extra grip I’ll rotate the light and actuate the switch with my index finger, shown in the left photo. Regaining the use of my thumb for grip helps a lot and makes the grip rock solid. Finally, it’s pretty comfortable to use a reverse grip too and actuate the switch with my pinky. This is great when holding the light at eye level to see far away and makes you feel like a lighthouse. This is probably the most fun grip.
There is no pocket clip, lanyard, or holster included. There are generous lanyard holes for any kind of lanyard you could want, and Convoy sells a separately available belt holster for a few dollars which I recommend adding to your order. It’s not so heavy that it’s uncomfortable to carry for an extended period of time, but having some way to retain it if you need to use that hand would be nice.
Batteries & Charging

What kind of battery(s) does it accept? Did it come with one? Does it have integrated charging? At what voltage did the charging stop? What battery did you use for your testing?
Battery: I purchased four unprotected flat top Sanyo NCR18650GA cells to use in this light. Their flat tops are slightly proud so they work great here even without the adapter. The light should be drawing somewhere around 20 amps on turbo, so the 40 amps of combined current I get from these GA’s should be just fine. I tried the light with 30Q’s for good measure and didn’t get any more output. Buying these GA’s separately cost me $20 more than it would have to buy the light with batteries, so I recommend buying that version instead.
I love that Simon chose to go with four 18650’s in this thing. Three 21700’s would have been great too. When I was hanging out with u/calmlikea3omb at the North Texas Flashlight Meetup, he used his K1 SBT a bit, and I use this 4X18A a lot. At the end of the night, his K1 was down to 3.8V after just a few minutes of use. My 4X18A was still at 4.0V after about 4X the usage thanks to having 14,000mah of capacity.
Battery Adapter: This is the coolest little cheap accessory I think I’ve ever seen included with a light. It’s an adapter that allows you to use flat top cells in a light with multiple cells in parallel like this one. It’s so simple and I can’t believe no one else has done this. Every single multi-cell light where the batteries are in parallel should come with one of these. This adapter will work in the BLF LT1.

Charging: The 4X18A includes a USB-C charging port opposite the button, covered by a very large rubber flap. It’s easy to access but it’s not quite as secure enough for me to be confident submerging the light. It’s totally fine for rain though. The USB-C port sits within a recess within the recess for the rubber flap. I didn’t have any issues fitting any of my USB-C cables in there, but I put the dimensions in the “size” section if you want to make sure your favorite cable will fit.
Charging worked just fine with USB A-to-C cables as well as USB C-to-C cables. It will not work as a power bank to charge other devices though. That’s not a feature I think I would use but it would be neat. The light is 100% functional while charging. It even works with the battery tube disconnected (except for turbo mode) which might be handy for ceiling bouncing to illuminate a space without draining your batteries.
I’m glad they included USB recharging here. I’m not a fan of rubber-flap-covered charging solutions on single-cell lights because I’m more likely to want/need to swap out a cell for an instant re-charge, and I’m likely to have an extra cell or two on-hand. For a big light like this, it’s got way more capacity so I’m less likely to need to swap cells. Plugging in a USB cable is way easier than removing four separate cells, putting them on the charger, and then putting them back in the light. I’m a lot less likely to have a whole extra set of married cells on hand too, so being able to charge the light while it’s being used is nice here.
Charging stops right at 4.2V and took six hours and 13 minutes to recharge from low voltage cutoff on a 15 watt capable USB-C charger.
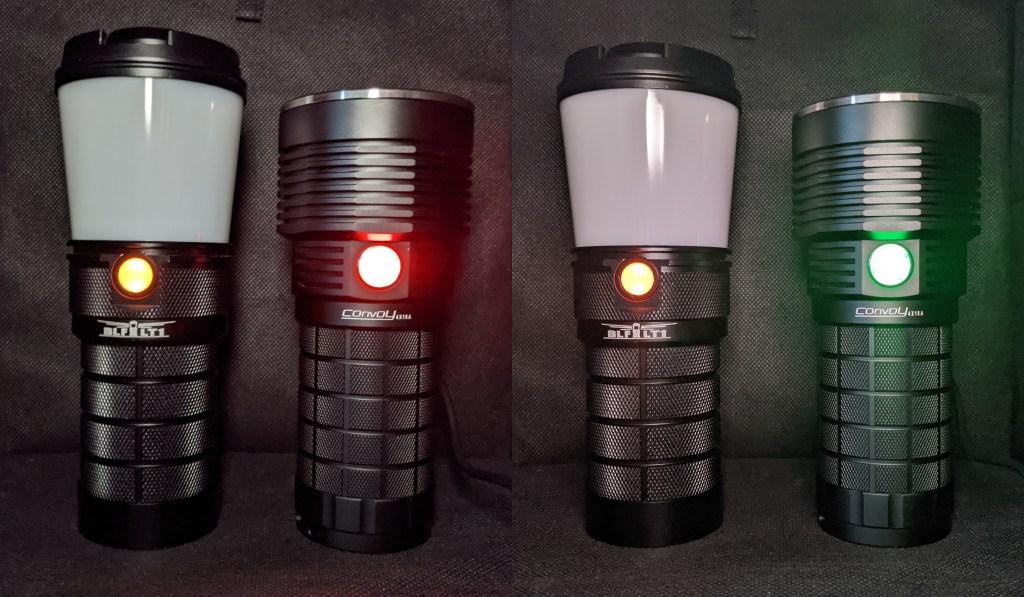
The only backlighting on the 4X18A switch is in the form of charging status indicator LED’s. Red which indicates charging, and green which indicates charged. I also observed orange a couple times when experimenting with charging, but I think it was just confused and turned on both the green & red LED’s at the same time. They’re very bright, almost as bright as the aux LED’s on my Emisar D4V2 and much brighter than the switch backlight on the BLF LT1. It’s super easy to see from far away in a well-lit room, but I would not want this thing charging on my nightstand while I’m trying to sleep.
A Problem?
After about a week and a half of use, the LED in my sample started flickering faintly and blinking all while the light is off. Here is a video showing the behavior. It happens about 70% of the time. Mechanical lockout stops it, so it’s not a huge issue.
When it was not exhibiting this behavior I measured 32 microamps of parasitic drain. While it was dimly flickering I measured ~43 microamps of parasitic drain, which is still perfectly acceptable for an e-switch light so battery life will not be affected. Its honestly just a minor annoyance more than anything, since the light doesn’t actually turn completely off unless you mechanically lock it out.
I reached out to Simon about it. He confirmed this is not normal behavior, said he would contact the driver manufacturer about it, and offered to send me a replacement driver. Once that arrives and I get it swapped in I’ll edit the review with an update on whether the new driver fixed the issue. I also asked a few other users here with the same light whether they have this issue and it appears to be unique to my sample. At this point I have no reason to believe this is anything more than a one-off lemon so don’t let this dissuade you if you’re interested in the 4X18A.
Competition
Convoy L7 and 3X21A: Upcoming releases from Convoy with the SBT90.2 emitter. The 3X21A is the same as a 4X18A but with three 21700’s instead of four 18650’s. The L7 is similar to the L6, but with a slightly updated design. It uses two 26650 cells and has a mechanical tailswitch for on/off and a side switch for mode changes. The 3X21A will have slightly higher battery capacity compared to the 4X18A and the L7 will have slightly lower capacity. The L7 should throw a little further.
Acebeam K30-GT: A little narrower, similar length, one less battery, similar output, a little wider hotspot with less throw, a little lighter, indicator LED, tripod mount & handle, more expensive, no integrated charging, acebeam is known for their build quality
Manker MK37 SBT90.2: Significantly narrower & shorter, one less battery, similar output, wider hotspot with less throw, TIR optic instead of a reflector (less spill with no defined edge), a little lighter, tripod mount, no integrated charging, more expensive
Wurkkos TS30S: Significantly smaller (particularly in the body) and lighter, optional stabby bezel, single 21700 cell instead of four 18650 cells and much lower capacity, better UI (anduril), a little more brightness but a lot less throw and a wider hotspot, a little less expensive (from Wurkkos) or the same price as the 4X18A but with fast shipping via Amazon.
Noctigon K1 SBT90.2: Similar overall dimensions but much narrower in the body, single 21700 cell instead of 4 18650’s resulting in much lower capacity, charging port is in the threads, better UI (anduril), RGB backlit button, slightly tighter hotspot and a little more throw, more expensive, multiple body colors available.
Conclusion

I love this light. I knew I wanted a 4X18A with an SBT90.2 in it before this was even announced. When it was announced I knew I had to have it. I ordered it the day it was released. It meets all my expectations. It’s not perfect in every way but there is nothing I can complain about at $100 with batteries. This is hands down the best value SBT90.2 light you can buy at the time of this review and I’m thrilled to have it in my collection. I highly recommend it.