
- Pricing & Availability
- What comes in the box?
- Design & Construction
- Size & Measurements
- Switch & User Interface
- Emitter & Beam
- Mode Chart
- Runtime
- Driver
- Batteries & Charging
- Carry & Ergonomics
- Competition
- Conclusion
Pricing & Availability
FlashlightGo.com sent me this light in exchange for an honest review. Here is the product page on their site where you can see current pricing. At the time of writing it’s $140 USD.
What comes in the box?
E28 comes in a nice box with a magnetic closure and a foam insert. Inside is:
- The light itself
- Batteries (inside the light)
- User manual
- USB C-to-C charging cable
- Wrist lanyard
- Pocket clip & associated torx screws
- Hex wrench that doesn’t fit the torx clip screws

Design & Construction
The design & aesthetic are very similar to the popular Loop Gear SK05 (Pro). Though side-by-side-battery layout flashlights are nothing new, this design looks futuristic.


Build quality is great. The fit and finish are excellent. The moving parts (switches and battery door) are precise. It feels dense and the batteries don’t shift or rattle.
Size & Measurements
Zebralight SC65c HI | Olight Warrior 3S | Jetbeam E28 | Nitecore EDC37 | Mini Maglite

Jetbeam E28 is significantly larger than Nitecore EDC37 despite using the same batteries (two 18650s).
| Measurement | Measured (mm) |
|---|---|
| Width | 47.3 |
| Length | 107.3 |
| Thickness at the bezel | 24.5 |
| Thickness at the rotary selector | 26.3 |
| Thickness at the body | 23.4 |
| Switch Diameter | 12.3 |
| Weight with included batteries (g) | 236 |
Switch & User Interface
The switches are good but the UI is pretty clunky. If you use it regularly you might get used to it.
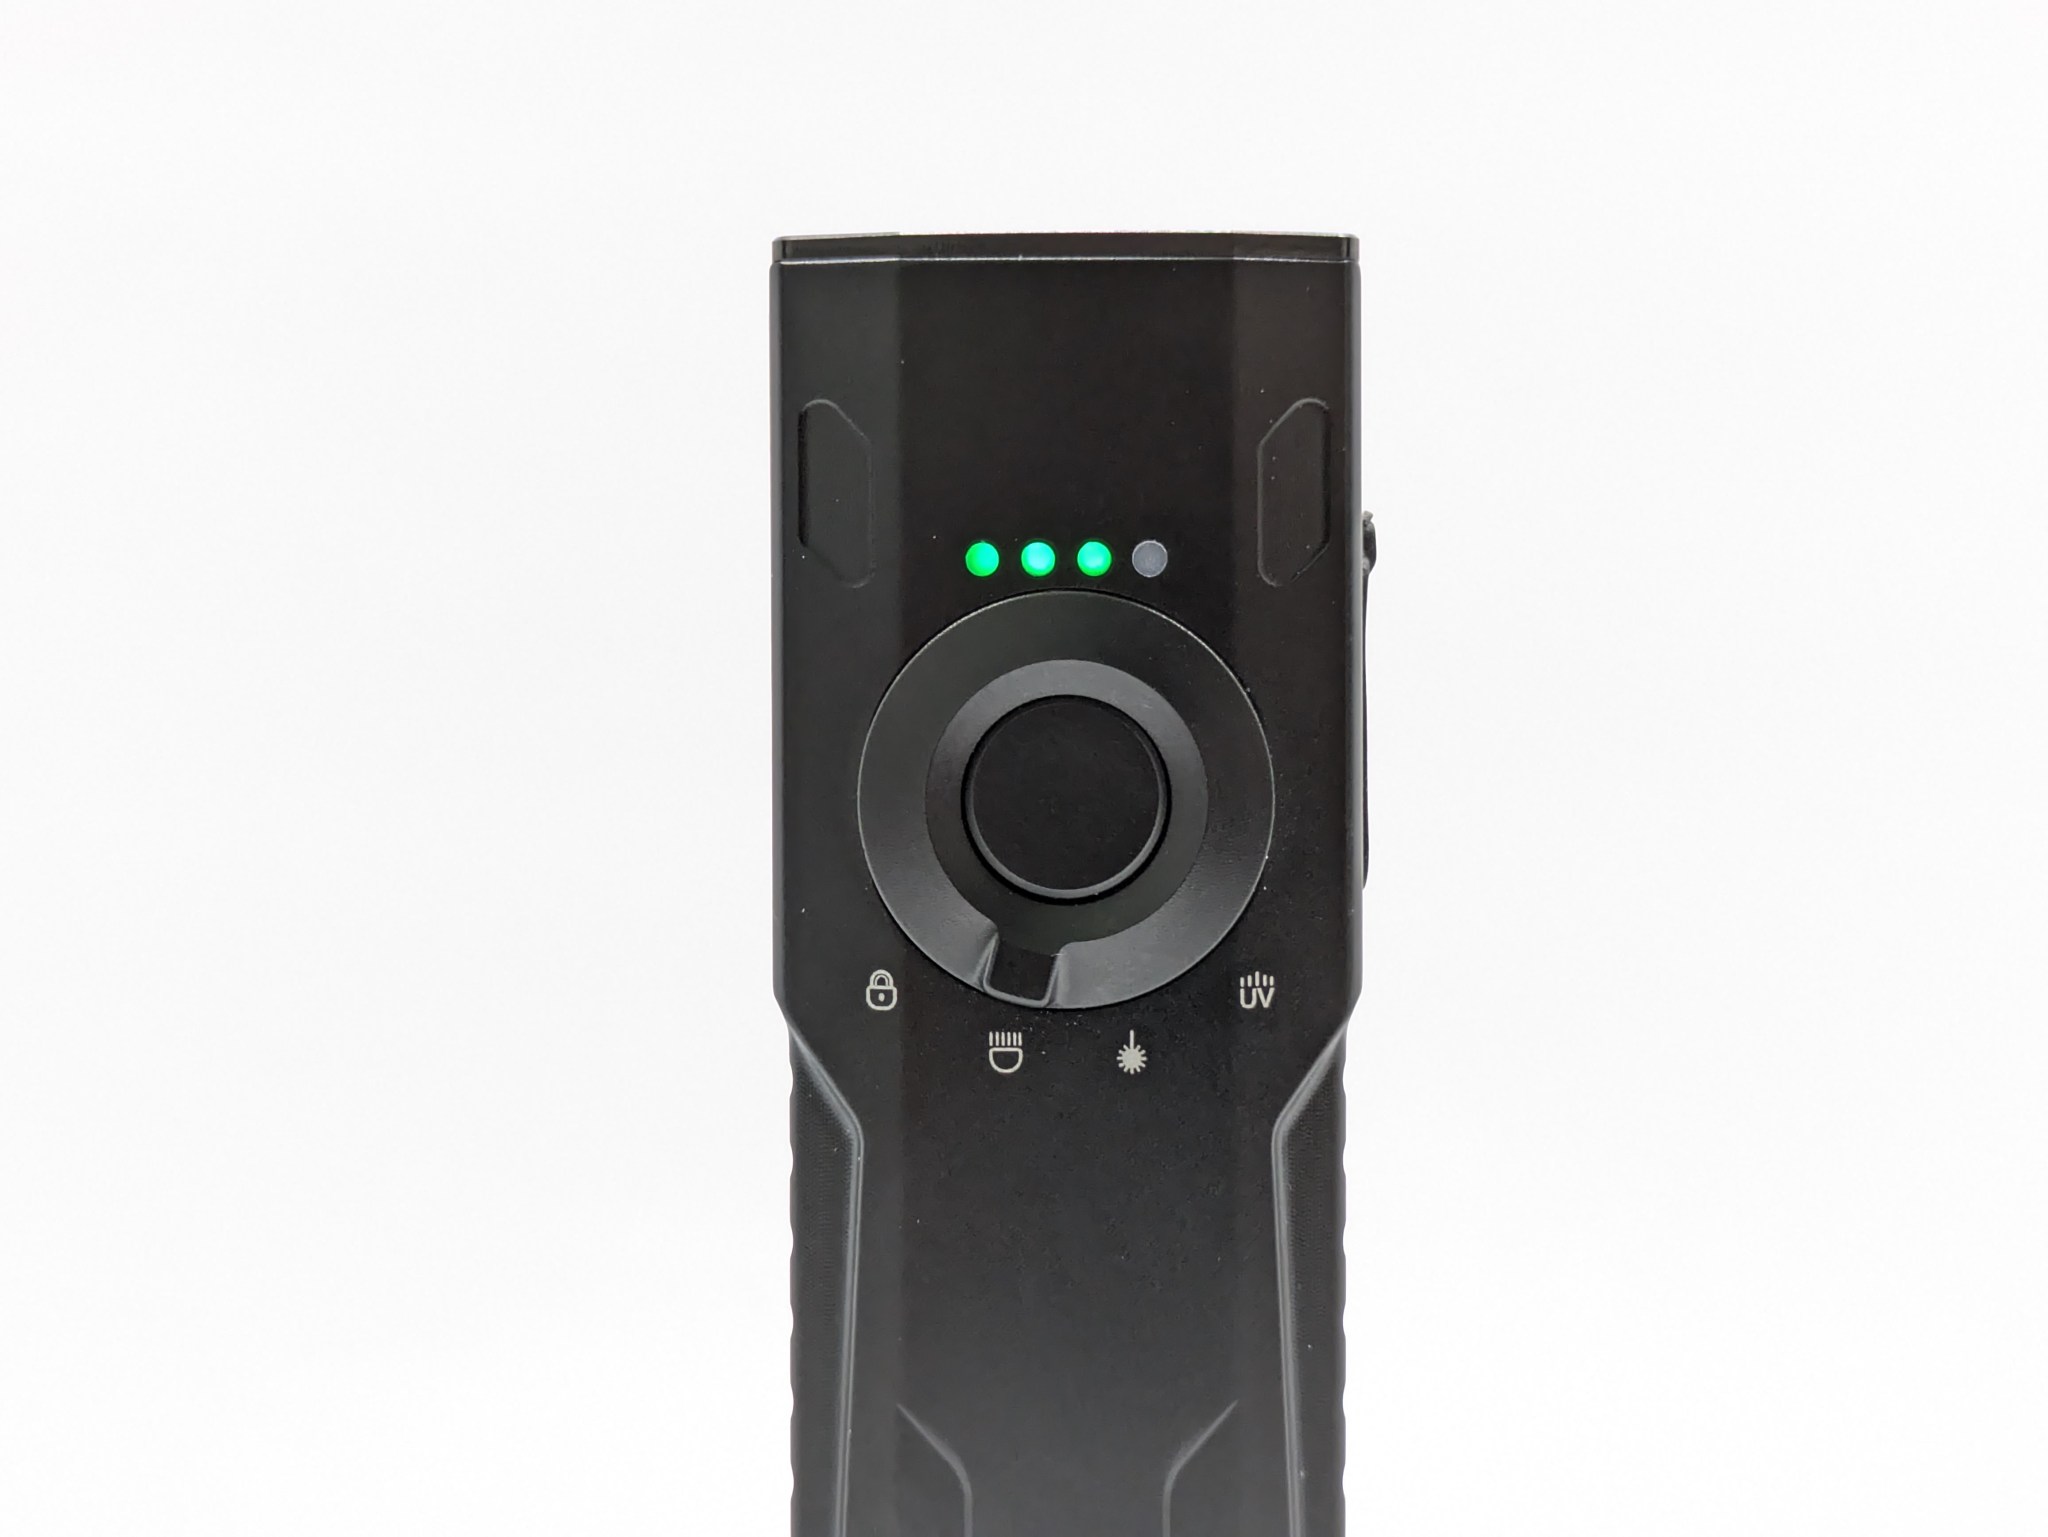
Switches: There’s an e-switch on the side and a rotary selector on the adjacent face. I like when multi-channel lights have a separate channel selector switch like this. This one has great detents and it’s right next to the button, so both can be accessed easily. The button is easy to find by feel and it has a great, tactile action. The only thing I don’t like about these switches is all three secondary lights being crammed into one position on the rotary selector.

Basic E-switch UI Checklist (white light): 8/12
- 1C on/off✅/❌
- It’s mostly 1C on/off, but 1C from Turbo takes it to the previous mode, which isn’t always off. That’s enough to knock off half a point. Normally I expect 2C from Turbo to jump back to the previous mode.
- 1H to change brightness✅
- Stepped levels✅
- Main rotation is Low-Med-High❌
- The main rotation also includes the ~10-25lm “moonlight” modes.
- Moonlight shortcut: 1H from off❌
- There is no Moonlight shortcut. Instead, 1H from off activated momentary Turbo of both white lights. I strongly dislike this as there’s no way to get to the lowest mode from off. 2H from off would have been better for the momentary combo Turbo mode, and would have left room for 1H to jump to “moonlight”.
- Low shortcut: 1H from Moonlight❌
- While low is technically accessible via 1H from Moonlight, there’s no shortcut to Moonlight. If Medium or High are memorized, you still have to go through them to get to Low.
- Turbo shortcut: 2C from anywhere✅
- Strobe shortcut: 3C from anywhere✅
- Mode memory for Low, Medium, and High✅
- No mode memory for Moonlight, Turbo, and Strobe✅/❌
- I’m giving this a half point because the “Moonlight” isn’t really a Moonlight mode and it has no shortcut, so memorizing it is not a problem. Turbo and Strobe are not memorized.
- 4C or separate switch to lock/unlock✅
- Lockout is a position on the rotary selector.
- Does something when you click the switch in Lockout mode✅
- There’s a lock icon on the rotary dial. That’s sufficient indication that it’s in lockout mode.
Secondary color UI:
- 1C on/off. That’s good.
- 1H from off activates white dual Turbo. I guess that’s handy?
- There’s no brightness adjustment. That’s worth mentioning but it’s not really a problem. None of the auxiliary modes get bright enough or dim enough that you need adjustable brightness.
- 1H from on cycles from UV to Laser to RGB and back. I wish 2C were used cycle the channel and 1H was reserved for changing the RGB color.
- In RGB mode, 2C will cycle the RGB function. Those are “constant ‘white’, single color flashing, constant gradient color, RGB flowing light, fast meteor light color change, multi-color breathing light, single bead marquee color change, full strip sequential on/off color change, and solid color constant on”. That’s a lot, and I wish it were just constant color, blinking color, and maybe constant gradient color.
- In RGB mode, 3C activates police strobe.
- In the constant color RGB modes, 4C will cycle to the next color. Green, red, blue, pink, yellow, cyan, and purple.
Notes:
- Side light mode memory does not persist through battery changes. Opening the tailcap and closing it again will reset side mode memory to UV, and the next time you switch to RGB mode it will be constant green.
- A double click from Turbo in the spot or flood channels will turn on the laser too.
Emitter & Beam
E28 has five channels. The flood channel uses an unspecified 7070 16-die domeless LED in ~4800K (a pleasant surprise), ~60 CRI. The spot channel uses a Luminus SFT42R in ~5700K, ~60 CRI. Both are somewhat green and low (~60) CRI. Then there’s a green laser, a single 365nm UV LED, and a bank of RGB LEDs. I removed the screws in the bezel to try and take it apart, but it felt like there was a wire or something holding the pull to the body so I didn’t force it open.


The white beams are both fine. I think it would have been nice to have wider flood from the flood beam and more throw from the spot beam though, since we have both to work with. When I first got it I was surprised it “only” goes up to ~3000 lumens and I expected more brightness from a light this size. However, actually using it I found the ~3000lm Turbo modes to be plenty bright without making it heat up instantly. I was able to take it on an evening walk and jump to Turbo frequently without it getting uncomfortably hot. That impressed me.
In the beamshots below, camera settings are fixed and the wall is 2.8M away.


In the beamshots below, camera settings are as similar as possible, the basketball goal to the right of the hotspot is 39M away, and the power pole in the center is 185M away.


UV LED Placement Issues: The UV LED being on the side and also being largely invisible caused problems for me. Several times when I went to use the laser or RGB light, the UV came on instead. Because it’s UV I couldn’t see it, so I instinctively looked at the side of the light and therefore directly at the UV LED. Twice I was holding the light trying to use the laser, but the UV LED came on instead. The UV LED shined directly on the skin of my hand and felt really hot, like I had tried to touch a stove briefly. This could all be user error from me getting familiar with how the light works, and because I frequently changed the batteries (which resets the secondary mode to UV). However, I haven’t had these issues with other combo lights with UV on the front. Moving the UV to its own channel on the selector switch would help too.
Mode Chart
Disclaimer: All of my measurements are taken at turn-on. Lumen measurements were taken on a Texas Ace 3.5″ Lumen Tube. A candela measurement was taken at 10 meters with an Opple Light Master III on the highest brightness, and other candela figures were calculated relative to that. CRI, CCT, & DUV data were taken for each mode from a few feet away at the center of the hotspot with the Opple Light Master and Waveform DUV Calculator. Runtime tests were performed with the Ceilingbounce app on my smartphone. These tests were performed with a fully charged included battery unless otherwise specified. I cannot measure moonlight directly, so moonlight readings are calculated based on the brightness relative to the next-lowest mode. None of this is professional equipment, so take these measurements with a grain of salt.
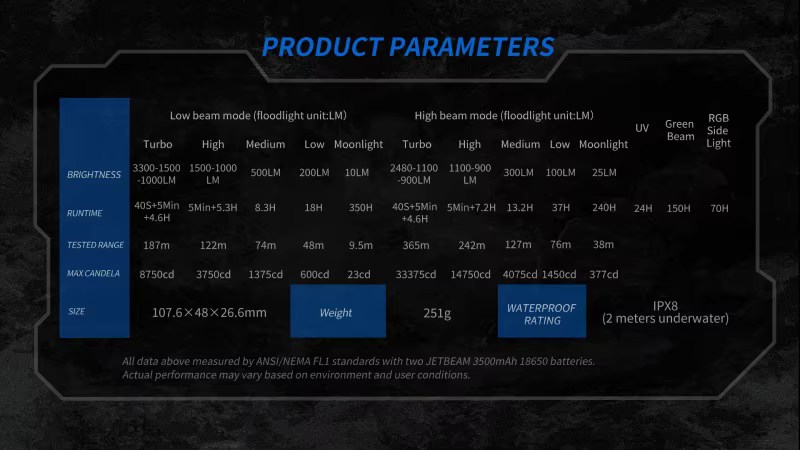
The official specs are above, followed by my own measurements below.
| Level | Lumens | Candela | Throw (Meters) | CRI (Ra) | Color Temp. (K) | DUV (Tint) |
| Turbo | 2900 | 10000 | 200 | 58 | 4710 | 0.0130 |
| High | 1200 | 4100 | 130 | 59 | 4700 | 0.0125 |
| Medium | 460 | 1600 | 80 | 59 | 4720 | 0.0125 |
| Low | 190 | 660 | 51 | 60 | 4740 | 0.0115 |
| Moonlight | 8 | 28 | 11 | 61 | 4860 | 0.0103 |
| Flood+Spot Turbo | 2800 | 19000 | 61 | 5340 | 0.0111 |
| Level | Lumens | Candela | Throw (Meters) | CRI (Ra) | Color Temp. (K) | DUV (Tint) |
| Turbo | 2300 | 39000 | 400 | 61 | 5680 | 0.0133 |
| High | 940 | 16000 | 250 | 61 | 5670 | 0.0129 |
| Medium | 300 | 5100 | 140 | 62 | 5770 | 0.0121 |
| Low | 100 | 1700 | 82 | 63 | 5820 | 0.0109 |
| Moonlight | 22 | 370 | 39 | 63 | 5840 | 0.0105 |
| Flood+Spot Turbo | 2800 | 19000 | 280 | 61 | 5340 | 0.0111 |
Runtime


Performance: Turbo time is poor at ~40 seconds. Sustained output is good at ~800lm. Regulation and runtime are great.
Thermal Management: My Turbo and Turbo Cooled tests are virtually identical, so there’s no active thermal throttling here, just timed stepdowns. That means performance will be consistent, but not optimized for ambient temperature. I found that after awhile running on Turbo or High in an air conditioned room, the light was right on the line between holdable and too hot to hold.
LVP (Low Voltage Protection) is present and works well. It doesn’t rely on the battery having a protection circuit. The light will shut off when the batteries are practically empty, but it can be temporarily re-activated in an emergency.
Driver

The driver isn’t specified. The batteries are in a 1S configuration and at least one of the LEDs is 3V, so it could be almost any type.


Voltage immunity is good/average. It maintains most of the Turbo brightness down to ~25-50% charge, and all the other modes are flat down to 25% charge or less. That shows the components are high quality and they’re being pushed hard for great performance.
PWM: No PWM is visible to my eyes or camera, nor audible to my ears.
Parasitic Drain: ~100 microamps. That will take ~8 years to drain the included batteries.
Batteries & Charging

The batteries included are 3500mAh protected 18650 cells that work fine. The light has LVP so it should work with unprotected cells, but they must be button tops because it has physical reverse polarity protection. The batteries are in parallel so you can use one at a time to save weight if you need to. Make sure they’re both the same voltage before putting it back into the light though!

Charging is facilitated by a USB-C port on the side opposite the button. It’s sealed by a silicone port cover. Charging takes around 3 hours and 45 minutes and it can’t be used while charging. It also has a powerbank function to charge other devices, which I expect from a light with this much battery capacity.
My sample makes and odd, faint, static/hissing noise when I use it to charge a smartphone, but doesn’t do that when charging other devices. I asked FlashlightGo about it and they tested another sample and couldn’t replicate the issue. I also asked another Redditor with an E28 if their sample does it and they said no. I think it’s just my sample, not a systemic issue.

The battery indicator is the RGB LEDs on the side. I prefer four-diode indicators but this system works ok. Here’s what it means:
- All green: >35% charge
- Half orange: 10-35% charge
- A few red: <10% charge
When plugged in to charge or as a powerbank, the LEDs repeatedly light up and ascend the side light. It’s very bright and somewhat distracting. The charging indicator can be misleading while charging. It indicates empty to near full charge in an hour, but keeps charging for almost 3 more hours.
Carry & Ergonomics


Ergonomics are great. In either hand I can comfortably reach the switch and rotary selector. My fingers naturally rest in the cutout on the side, and the rounded brick shape fits surprisingly well in the hand.


Clip score: 4.5/7
- Attachment doesn’t pop off or rotate accidentally✅
- Can be removed and bent back into shape if needed✅/❌
- It can be removed, but since it’s a double loop over I don’t know if it can be bent back into shape if it gets bent out.
- Bezel-down carry is at a reasonable depth✅
- Landing location is smooth, not on the charging port, and away from the bezel✅
- Mouth/ramp and loop(s) are wide enough for pants material❌
- The screws stick way out into the clip, partially blocking pants material from getting through if you have the mouth side of the clip toward the bezel. You can flip the clip around (as shown in the photos above), but then you have to carefully line up your pants edge between the mouth and the rounded bottom of the clip. This issue ruins the clip for me.
- Finish is durable✅
- No bidirectional clips without reason❌
- I see no reason to have a bidirectional clip here. This light is WAY too big and heavy for a hat, and even if you wanted to the clip can already be reversed so it doesn’t need to be bidirectional.

Magnet: There’s a magnet in the tailcap. It feels a little weak but it can technically hold the light up on a vertical surface. There’s also a tripod mounting hole on the tailcap.
Competition
Here are some lights in the same class and how they compare.
Loop Gear SK05 Pro: The elephant in the room
- very similar design and very popular
- similar price
- triple LEDs and optic on the flood channel
- aux LEDs behind the front optic
- a bit spottier spot beam and a bit floodier flood beam
- available with Nichia 519A LEDs on the flood channel
- no laser or UV
- virtually identical white light UI, better auxiliary modes UI
- marginally higher-capacity 4000mAh 18650s included
- much better pocket clip
Nitecore EDC37: Compact hotrod alternative
- similar price
- jaw-dropping brightness and much more impressive throw
- significantly better UI, though still non-standard
- dedicated momentary Turbo/Luminshield switch
- dedicated lockout switch
- OLED display for brightness, runtime, and battery information
- better (but not great) pocket clip
- optional glass breaker bezel
- non-user-serviceable batteries
- no laser, UV, or RGB
- no magnetic tailcap
- no dedicated flood channel (it’s flood+spot, or just spot)
- no powerbank function
Olight ArkPro: EDC alternative
- similar price
- much smaller and lighter size for EDC
- less brightness and throw
- all the same functions except RGB
- built in battery (not user serviceable)
- much better UI
- proper Moonlight modes
- much better clip
- no powerbank function
This section is not comprehensive. If I didn’t include a particular light here, it doesn’t mean it’s bad or doesn’t deserve to be here. I simply cannot list every possible competitor.
Conclusion
The design is very similar to another popular light. Pricing is a bit expensive. The build quality, runtime, ergonomics, regulation, user-swappable batteries, and switches are all great. The brightness, voltage immunity and powerbank function are good, though my sample has a powerbank issue. The beams are fine but I would prefer a tighter spot and wider flood on a light that has both. The UI is clunky, the UV LED is in a poor location, and the clip is borderline unusable. Overall, it’s a decent option with a lot of features (spot, flood, UV, laser, RGB, user-swappable batteries, powerbank, etc).
Thanks to FlashlightGo for sending me this light for review!


