
Updated 2021-12-09 with lumen measurements and some more thoughts.
The Boring Stuff
I purchased this light with my own money from Amazon for $75 when Sofirn had a 25% off coupon code going. It arrived in exactly one week. Normal price from Amazon is $94 but you can get it cheaper from Sofirn if you’re willing to wait longer. Here is the official product page and below are the official specs.

What comes in the box?
The box is Sofirn’s typical box. It’s relatively thin cardboard with a piece of foam on the bottom. It’s only just big enough to fit everything inside. The light comes with a slip of paper stuck to it reminding you to remove the insulating disc from the battery compartment, and it’s wrapped in a sheath of bubblewrap. Also included is a basic manual, spare o-rings, a spare switch boot, and a USB A-to-C cable.

Size & Measurements
From left to right:
Sofirn BLF LT1 (Rev. 5)
Convoy 4X18A
Sofirn Q8 Pro
Emisar D4V2

| Measurement | Measured (mm) |
|---|---|
| Bezel Diameter | 58.9 |
| Length | 133.7 |
| Switch Diameter | 10.7 |
| Switch Proudness | 1 |
| Body Tube Diameter (maximum) | 50 |
| Driver Diameter | 47.5 |
| USB Port Width | 12.1 |
| USB Port Depth | 2.1 |
| Tripod Hole Depth | 7 |
| Tailcap Diameter | 52 |
User Interface
Q8 Pro comes with Anduril 2, the best flashlight user interface available at the time of writing. I am not even remotely prepared to do a whole UI table & breakdown for this thing, so here’s a screenshot of the UI table from the end of Toykeeper’s Anduril 2 manual and below I’ll go over some of my favorite features.

The addition of momentary turbo access from off via 2H is excellent. For one, it allows me to set my top of ramp well below turbo (to keep it from burning my pocket or to keep it within the regulated channel) without losing direct access to turbo. I also love shortcuts and this feature gives me a fourth shortcut from off. 1H goes to bottom of ramp, 1C goes to the level I have memorized, 2C goes to top of ramp, and 2H goes to momentary turbo! I only ever really use turbo for less than 5 seconds at a time anyway so momentary works great.
The updated sunset timer is a huge improvement. In Anduril 1, sunset was its own mode that always started at the same brightness and always lasted 30 minutes. In anduril 2, you can enable a sunset timer in almost any mode in 5 minute incriments. I use this every night before bed so the light slowly dims as I’m falling asleep and I don’t have to worry about turning off the lights. This feature alone makes me wish I had paid full price for a BLF LT1 with Anduril 2 instead of buying the Anduril 1 version when it was on sale.
Some other features I don’t use all the time but I really like: auto-lockout, hybrid mode memory, simple mode.
One change a lot of users don’t like is that 2C from on now goes to top of ramp instead of turbo. I’m still undecided about whether I like this or not, but it’s growing on me because 3H from on goes to momentary turbo. That means that from anywhere in the ramp I can get to both turbo (3H) or top of ramp (2C) and back easily. You can always set your top of ramp to level 150 though if you want 2C from on to go to turbo.
Then of course there are all the awesome features of Anduril 1 that get carried over, like being able to choose a stepped ramp or smooth ramp, choosing automatic or manual mode memory, super easy day-to-day operation with one click on/off, shortcuts to moonlight and to high, fun modes like lightning and candle, and all sorts of other great stuff.
Did I mention I like the UI? With Anduril 2 being available now and having such a great simple mode as the default, I don’t think there’s any reason why every new e-switch flashlight shouldn’t be running Anduril 2.
Modes, Brightness & Throw
Disclaimer: A Turbo lumen measurement was taken at turn on with a Texas Ace lumen tube., and aTurbo candela measurement was taken using the Ceilingbounce app on my smartphone. All other measurements are calculated relative to those. All of these tests were performed with a fully charged included battery unless otherwise specified. I calibrated the thermal sensor before the first test and the thermal limit is set to the stock 45C unless otherwise specified. Ambient temperature was 20-21C (68-70F).
| Level | Lumens (Estimated) | Candela | Throw (meters) |
|---|---|---|---|
| Turbo (level 150 | 8,200 | 57,500 | 480 |
| High (level 113) | 3,523 | 24,725 | 315 |
| Medium (level 75) | 573 | 4,025 | 126 |
| Low (level 37) | 45 | 311 | 35 |
| Moonlight (level 1) | 1.17 | 8 | 6 |
Why these modes?: I prefer all my lights to have five evenly spaced modes: moonlight, low, medium, high, and turbo. I’ve set up Q8 Pro with bottom of ramp set to level 1, top of ramp set to 113, and 4 steps. Turbo (150) is accessible from off via 2H or from on via 3H. That’s why you see these 5 modes below and in the runtime section, rather than using the stock modes.
Regulation
| Voltage | Medium Lumens | TurboLumens |
| 4.23 | 574 | 8200 |
| 4.02 | 510 | 7893 |
| 3.81 | 445 | 6272 |
| 3.62 | 381 | 4872 |
| 3.40 | 425 | 3523 |
| 3.16 | 317 | 2511 |
| 3.00 | 172 | 959 |
Turbo: It’s not great, which is what I expected because it’s FET driven on Turbo mode. At 3.6V (about half charged) you’re getting about 60% relative output. At 3.0V (almost dead) you’re getting about 12% relative output.
Medium: Medium is a little better. 3.6V gets you 66% relative output and 3V gets you 30%. While that’s better, it’s still not as good as I was expecting from the claimed 5×7135 channel.
Runtime & Currents


Turbo 70C Cooled: This is just to illustrate the maximum output you can achieve if you pull out all the stops. I raised the thermal limit to 70C and set a fan blowing right onto the light. It resulted in a sustained output of about 4000 lumens for a little over half an hour. If you feel like attaching a fandle (handle with a fan on it) to this thing and going exploring you’ll get some blistering output, just not for very long. You’ll get near full turbo output for a good two minutes also which is impressive.
Turbo 70C: This illustrates the sustained brightness you can get without any active cooling if you max out the thermal limit, about ~1500lm. If you can attach a handle to the light or mount it on a tripod you can expect this much brightness for nearly two hours. You’ll get full turbo output for over a minute after turn on as well. This is not bad performance, but it’s not impressive for such a large light.
Turbo: Turbo starts out at 8,200 lumens, a fair bit short of the 11,000 lumen claim. At around 30 seconds it starts a heavy thermal stepdown and finally settles at a little under 750 lumens around the 6 minute mark. It fluctuates a bit but stays at around 750 lumens for 4.5 hours before dropping to moonlight. It stays on moonlight mode for several hours and I stopped the test before it completely shut off. The cells were at 2.85V when I ended the test. 750 lumens sustained output is really sad for such a large light.
High: High looks virtually identical to Turbo, just with a lower initial brightness and an extra 10 minutes of runtime.
Medium: Medium starts out at ~575 lumens and slowly drifts down over the next nine and a half hours. Then the low voltage stepdown kicks in. I would have like to see a flatter output here, but the slow drift downward does elongate runtime. Even by the end you’ve still got a good amount of light, and nine and a half hours is enough to get you through most nights.
LVP: Q8 Pro does have low voltage protection. I never observed it in my actual runtimes because I stopped the tests before it hit LVP. It just runs for ages on moonlight mode. I did verify it has LVP by activating turbo when it was very low on power and it shuts itself off due to the voltage sag, so I know it works.
Current: Since I’m not equipped to do extreme duration runtime tests or extremely high current measurements, I only measure the currents on low modes and I calculate the estimated runtime of those modes based on the capacity of the battery or batteries I’m using for testing.
| Level | Current @ Tailcap (milliamps) | Estimated runtime |
|---|---|---|
| Low (level 37) | 133 | 90 hours |
| Moonlight (level 1) | 5.3 | 94 days |
| Parasitic Drain (switch high) | 3.0 | 6 months |
| Parasitic Drain (switch low) | 0.15 | 9 years |
| Parasitic Drain (switch off) | 0.1 | 13.7 years |
Emitter & Beam
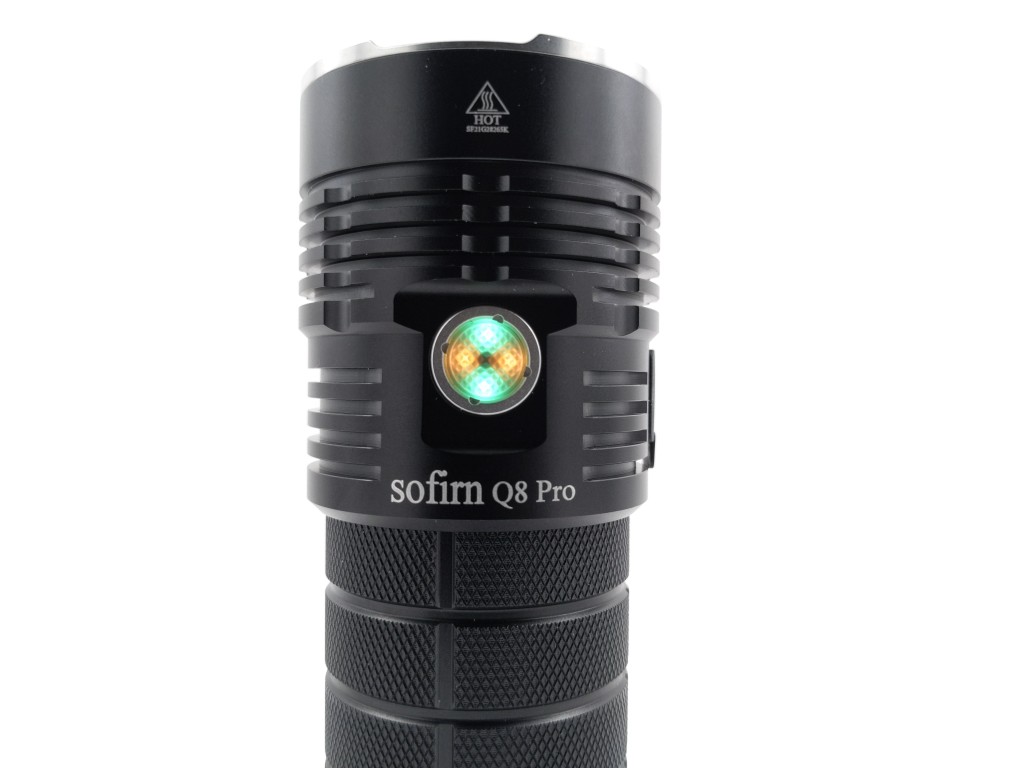
Q8 Pro uses four, cool white, 3V, XHP50.2 emitters in a quad orange peel reflector (not smooth like the official product photos show). This is definitely not the prettiest emitter around, but it’s very bright, and four of them together are extremely bright. They’re a good choice here. I think it would be awesome for Sofirn to release an alternative version with SFT40 emitters and smooth reflectors too for a throwier beam profile. Another version with warm/neutral white high CRI emitters would be nice too, but I can’t think of any that would fit in a 5050 footprint like this or handle this much current.

The beam is as you would expect, floody and extremely bright. The hotspot is narrower than I anticipated but it’s still plenty floody. The spill is quite wide and has four distinct flower petals thanks to the quad reflector setup. They’re softer and less defined than the petals on an SP36 with LH351D’s though.


There is some tint-shift present as you would expect from domed XHP’s. The orange peel finish on the reflectors does a good job of minimizing it and it’s not really noticeable or unpleasant most of the time. You can clearly see the flower petals here.

From left to right:
Convoy 4X18A SBT90.2
Sofirn Q8 Pro
Fireflies E07x Pro SST20 4000K
Emisar D4V2 SST20 4000K

Moonlight mode on Q8 Pro is surprisingly low. It’s not the lowest I’ve seen, but I estimate it’s just over 1 lumen which is perfectly acceptable for a large light like this.
Design & Construction
Q8 Pro’s design is clearly an iteration of the original Q8. It’s a 4×18650 soda can sized light with a head that’s a little bit bigger than the body. There’s a nice stainless steel bezel with some non-aggressive crenulations on it to allow light to escape when it’s sitting bezel-down on a surface. There’s nothing ground-breaking about the design but it’s proven and it works well.


Build quality is great. There’s nothing “wow” about it but it’s totally satisfactory. The machining is nice with no sharp edges. Anodizing is even and high quality. The threads are trapezoidal cut and sufficiently lubed.


The PCB in the tail end is stamped Q8 pro and includes double springs for each cell, reducing resistance. The body tube appears to be identical to the one on the Sofirn/BLF LT1, but the tailcaps differ slightly. The Q8 Pro’s tailcap is shorter and doesn’t include the tripod hole on the bottom. That, and some magnets in the dead space around the tripod hole, would have been a really great inclusion.


There are no reflashing pins accessible on the driver like there are on the LT1. That’s a real shame and they should come standard on every enthusiast light. The driver is held in place by two Philips head screws. They’re easy to remove and the driver isn’t glued down, it’s just kind of fiddly to pull it up through the threads so I didn’t try it.
Switch
Q8 Pro uses a large electronic side switch. It’s tactile and audible with minimal travel. It’s textured and is easy enough to distinguish from the rubber charge port cover even in the dark with the backlight turned off. It’s an excellent switch.


There’s a translucent black boot that lets light through from the LED’s underneath. There are two sets of LED’s: one set of green ones at 12 and 6 oclock that are configurable within the UI, and one set of blue and orange ones that indicate charging (both in and out). Sometimes the orange ones will come on for no apparent reason.
I wish that the switch were RGB backlit instead of just green. The green is disruptively bright most of the time. This follows the trend of most Anduril aux LED’s being too bright on high and too dim on low. If it were switched to RGB, then the settings could be overridden when a charging cable was plugged in to avoid confusion. Red should indicate charging and green should indicate a full charge.

Carry & Ergonomics
Q8 Pro is pretty nice in hand. It’s not prohibitively heavy or bulky. I can get a decent grip on it with my large hands. The switch is in an easily accessible position (even in a reverse grip) and there aren’t any sharp edges.


I wish Sofirn included, or at least sold separately, a basic handle that screwed onto the tripod hole. It would be nice to be able to max out the thermal limit and run the light as hot as it can go without burning your hand off. Increasing the thermal limit from 45C to 70C effectively doubles the sustained output.
There is no method of carry included with Q8 Pro. There’s no pocket clip, lanyard, or a spot to attach either. No holster is included, but you can get a version that includes one on Sofirn’s website. I found it fit OK in either a Convoy 4X18A holster or a Convoy M21C holster. There’s no magnet in the tailcap. If you want to carry it, you’ll have to keep it in your hand or have some pretty roomy pockets (like in a jacket or cargo pants).
Batteries & Charging
Four Sofirn branded 18650’s are included with Q8 Pro. They are 3000mah, unprotected button tops and appear to be identical to the ones included with the Sofirn/BLF LT1. I would have preferred to see some higher drain or higher capacity cells included. In my limited testing, these can provide about as much current as a Sanyo NCR18650GA, but with 500mah less capacity. Some higher drain cells like Samsung 30Q’s would probably allow for even higher turbo output than is advertised. These cells are good enough though, and they’re certainly going to be less expensive than buying anything separately. You could power the light off just one cell, but turbo output would be reduced and you would need to recharge that cell separately from the other three before using them all together again.

Charging is facilitated by a USB-C port on the side of the light between the switch and tripod hole. Normally I would expect the charging port to be opposite the switch, but that spot was already taken up by the tripod hole and that’s fine. Charging works with both C-to-C cables and A-to-C cables. The light is fully functional while charging, but if you remove the batteries it gets really finicky and doesn’t seem happy. I wouldn’t plan on using it plugged in without the batteries installed. Charging stopped at 4.23V which is a little bit high but not concerningly so.
While charging, the green switch LED’s don’t do anything different than they do when the light is plugged in. There are blue LED’s that come on and blink when the light is charging and they turn constant when it’s fully charged. This isn’t a great charging indicator and I would have preferred a more standard red for charging and green for fully charged. Charging took 4:45.
I want to take a second to praise Sofirn for their excellent execution of a rubber port cover. These are notorious for being flimsy and coming open by accident, leading to water ingress, but Sofirn did an stellar job with this one (and all of theirs I’ve tried). The cover has a lip around the backside of it that fits into a groove all around the inside of the port. This lip and groove holds the cover on more securely than any other design I’ve seen. I have zero concerns about water ingress on this one. It’s so well sealed that if you tighten down the body tube and then open the port cover, there’s an audible “fffp” sound of pressure releasing from inside the light. Well done, Sofirn.


One of the stand-out features of Q8 Pro is its ability to be used as a power bank to charge other devices! It’s got a whopping 12000mah of capacity with the stock batteries so it can should be able to recharge your average smartphone about three times. When charging another device, there are orange LED’s behing the switch that turn on and blink. My phone indicated that it was receiving 2.2A while it was plugged into Q8 Pro.
The orange switch LED’s turn on at random times to indicate power-out status. Constant on while unplugged means there’s enough juice for powerbank functionality. Blinking while unplugged means there’s not enough juice for powerbank functionality. Blinking while plugged in means it’s charging the other device. These orange LED’s are unintuitive enough that I had to ask Sofirn what they meant. I don’t see any need for these orange indicators and they are nothing more than a minor nuisance since they turn on randomly and there’s no way to turn them off. You just have to wait for them to turn off on their own.
Overall the charging implementation on Q8 Pro is pretty good.
Competition
Here are some lights in the same class as Q8 Pro and how they compare.
Astrolux MF01S: Shorter, wider, no built in charging, weird threading on tripod hole, older version of Anduril, aux LED’s, more color temp & CRI options, more expensive, can be brighter depending on emitter choice
Sofirn SP36: smaller, lighter, dimmer, one fewer battery, previous version of Anduril, more emitter options, less expensive, no powerbank feature
Original Sofirn Q8: dimmer, inferior UI, no integrated charging
Emisar D18: smaller, lighter, one less battery, 18 emitters instead of 4, multiple color temp options, more even beam profile, no integrated charging nor powerbank, better driver, older version of Anduril, no backlit switch, more expensive, doesn’t include batteries
Convoy 3X21A: larger, different batteries with more capacity, inferior UI, dimmer, triple instead of quad, throwier, less secure charging flap, no powerbank feature
BLF GT3: slightly larger, no built in charging or powerbank, older version of Anduril, more expensive, cells aren’t included, significantly brighter turbo and much higher sustained output, triple XHP70’s instead of quad XHP50’s, looks like an Olight, more body color options
Conclusion
Q8 Pro is a good, cheap way to get lots of turbo output. The user interface, build quality, and overall design are great, but the performance is pretty underwhelming for such a large light. With that said, the pricing is appropriate for what you get. If you just want a bright wall of light for a few seconds on turbo, this is a good choice.

Hi. I have just bought two of these, in 5000k and 6000k hues. I was wondering, and you mentioned it somewhere, how one goes about raising the cut off temperature- as you said you could get 2000lm sustained by doing do. Also, is this safe- not just from a handling perspective but in terms of the lithium batteries most importantly!
LikeLike
Hi. I have just bought two of these, in 5000k and 6000k hues. I was wondering, and you mentioned it somewhere, how one goes about raising the cut off temperature- as you said you could get 2000lm sustained by doing do. Also, is this safe- not just from a handling perspective but in terms of the lithium batteries most importantly
LikeLike
Raising the cutoff temperature to the maximum allowed 70C is safe for the electronics and the batteries. It is far too hot to touch though, so only do so if you are not going to be touching the light at all, or you will be wearing gloves while using it.
LikeLike
Great review, thanks! The parasitic drain runtime numbers in the chart don’t make any sense. Did they get switched?
LikeLike
I’m glad you like the review! Thank for the heads up about the parasitic drain numbers! I’ve corrected it.
LikeLike