
Pricing & Availability
Wuben sent me this light in exchange for an honest review. Here are the official product page and Amazon US page where you can see current pricing. Those are tracked links so they know I sent you, but I’ve chosen not to earn any affiliate commission. At the time of writing, MSRP appears to be $100 USD but it’s been on sale at both stores for $80 USD for a few weeks.
What comes in the box?
X5 comes in a nice two-piece retail box with a foam insert to keep the light secure. Inside is:
- The light itself
- Battery (inside the light)
- User manual
- USB C-to-C charging cable / Wrist lanyard
- Allen wrench for clip screws

Design & Construction
X5 has Wuben’s signature chamfered-block aesthetic. It’s a cool looking light. That big laser warning is a removable sticker.


Build quality is great. The moving parts are especially nice with great action and detents.
Size & Measurements
Surefire G2X Pro + Switchback | Zebra SC65c HI | Wuben X5 | Streamlight Microstream | Mini Maglite

Noctigon KR3 | Olight ArkPro | Wuben X5 | Olight Warrior 3S

It’s a fairly large and bulky light despite being a bit thinner than competing cylinder lights.
| Measurement | Measured (mm) |
|---|---|
| Length | 137.5 |
| Width (typical) | 28.8 |
| Width (maximum) | 34.8 |
| Thickness (excluding clip) | 16.0 |
| Pocket Clip Screw Spacing | 10.0 |
| Weight with included battery (g) | 129 |
Switches & User Interface
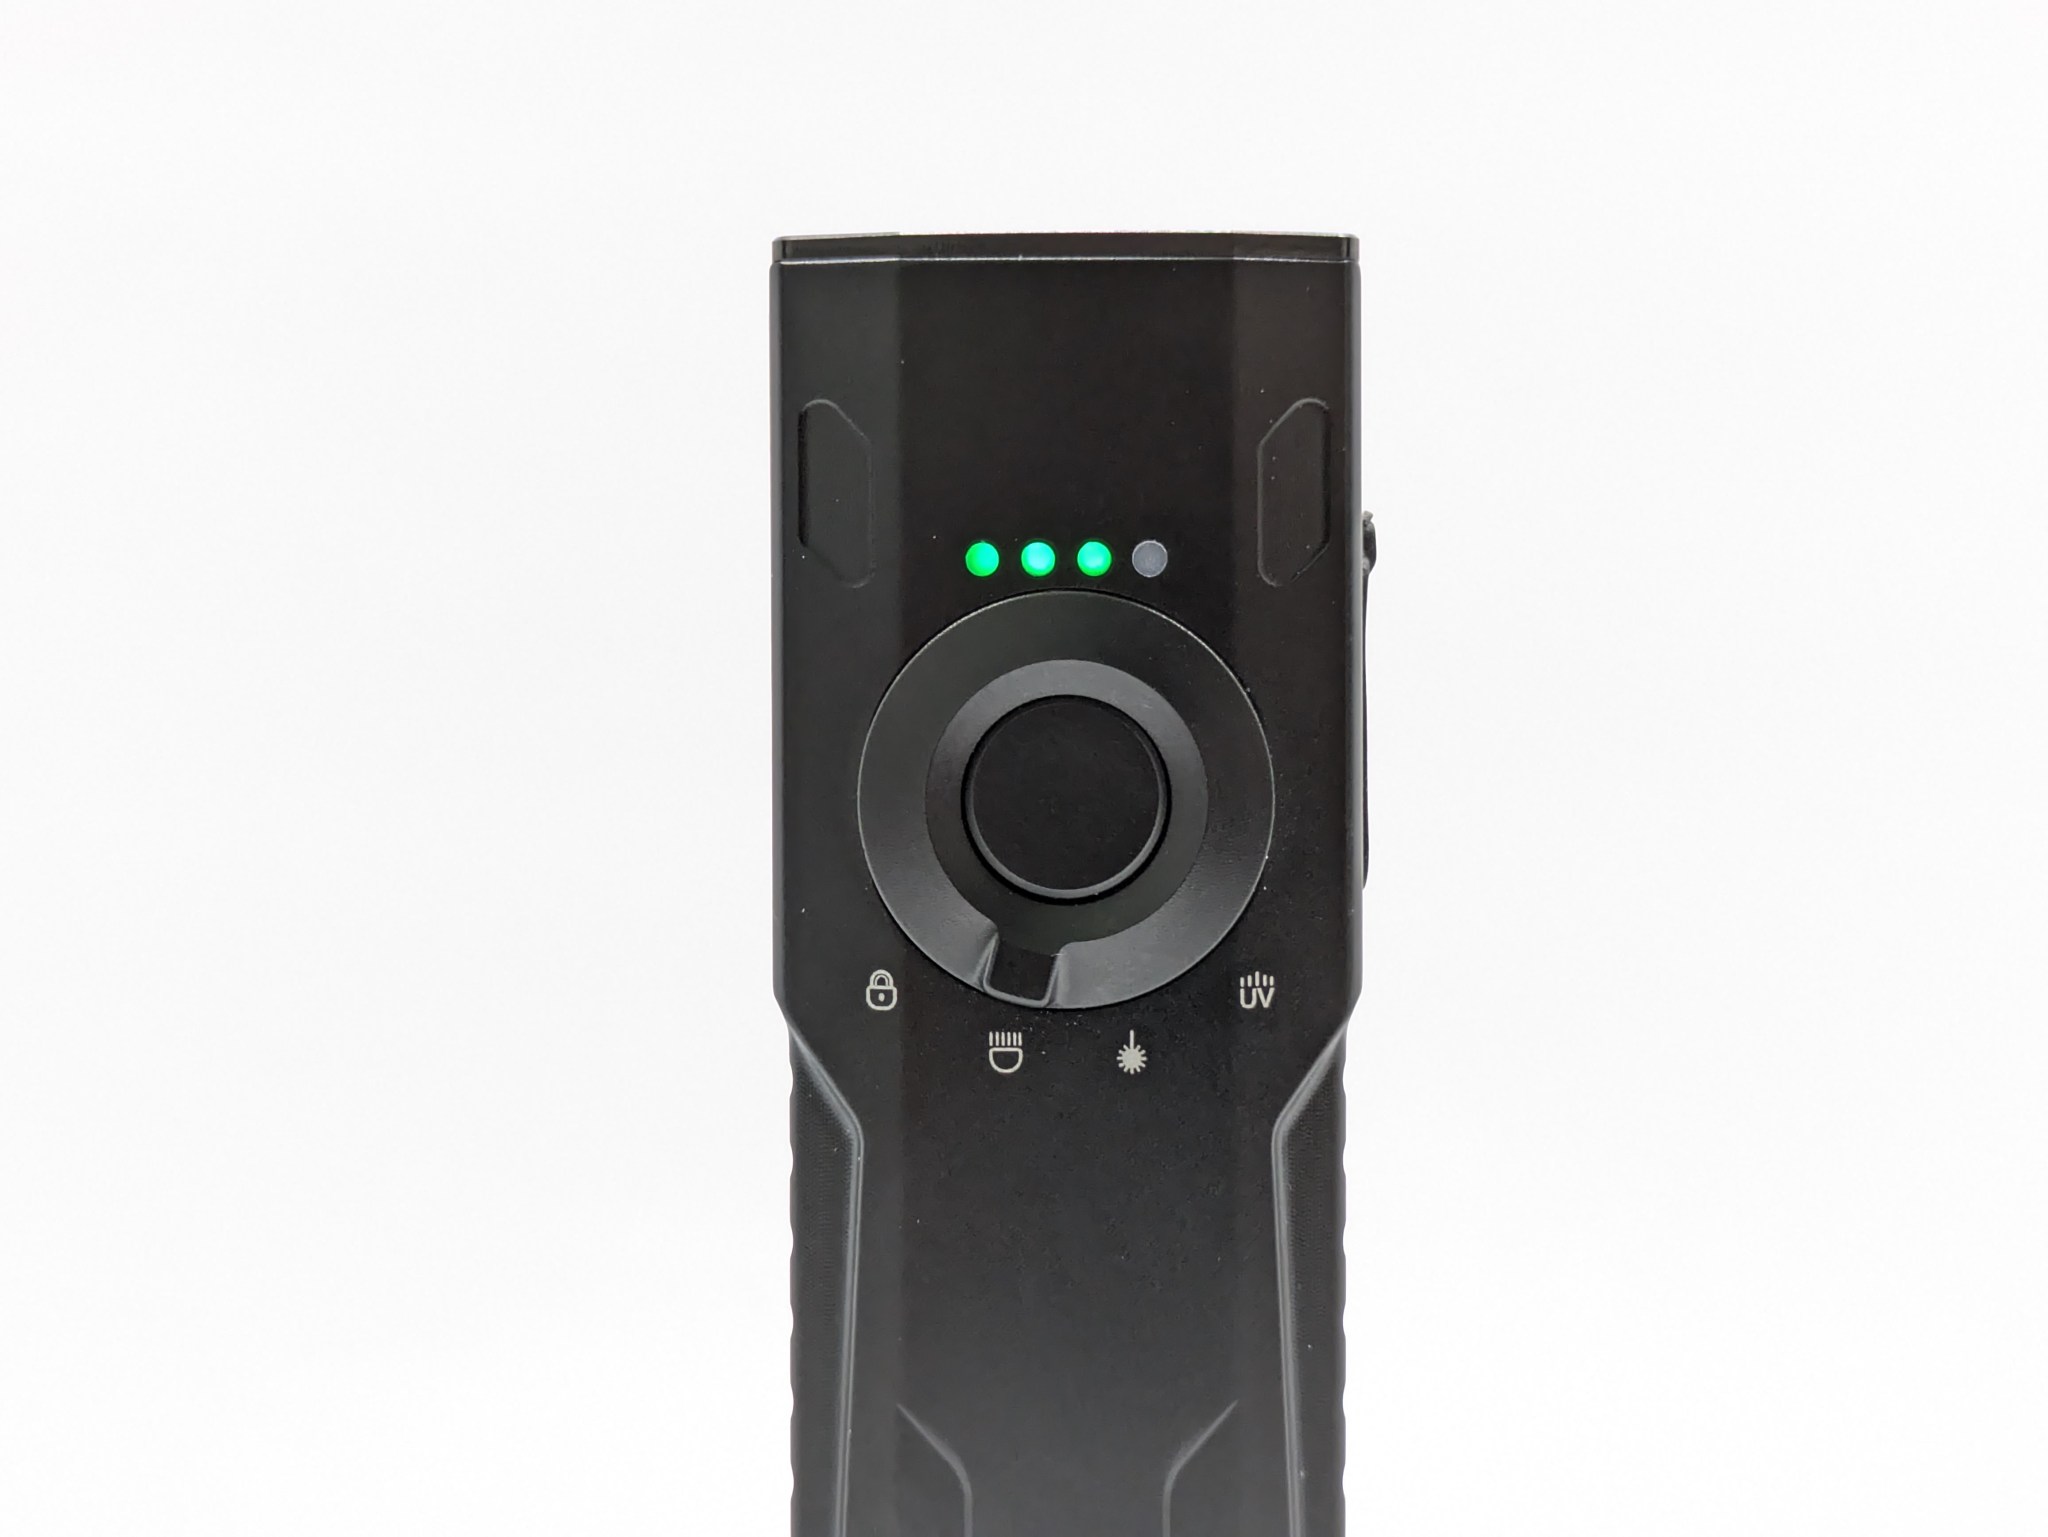
X5 has three switches. There’s a main two-stage e-switch on the tailcap, a laser switch on the tailcap, and a rotary selector on the side. Making the main switch taller than the laser switch is a nice tough that makes them easy to tell apart. Though, I have concerns about the main switch being pressed by accident. I don’t like having to carry a light locked-out to keep it from turning on in my pocket.

How it works:
- On/off: Press the main switch all the way in to turn the light on/off.
- Momentary on: Half-press-and-hold the main switch from off. Release to turn off.
- Mode memory: It always turns on at the last used brightness level, even in momentary-on.
- Mode changes: Half-press the main switch while the light is on.
- Channel selection & lockout: Rotate the knob on the side of the light to select among white light, lockout, and laser.
- Shortcuts: Double-click the main switch for Strobe. There are no other shortcuts.
- Laser: Press the laser switch to turn it on/off. You can use the laser and white or UV simultaneously.
- UV: Rotate the selector to the UV position and then use the main switch. It’s a single level and can be constant-on or momentary.
- Lockout: Rotate the selector to the lock position. Rotate it to white light or UV position to unlock.
What I think:
- ✅ Full press on/off is simple and intuitive.
- ✅ Lockout on the rotary selector is excellent.
- ✅ Momentary on is cool.
- ✅ I like the 5 stepped levels.
- ✅ Mode memory on the main levels and not on strobe mode is good.
- ❌ There’s no momentary laser function. Holding the laser switch should activate it momentarily until I release the button.
- ❌ The strobe shortcut is way too easy to activate by accident. Just trying to change the brightness too fast will activate strobe mode.
- ❌ No turbo nor moonlight shortcuts: There’s no way to jump to the dimmest or brightness modes. You must click the light all the way on and then click through the levels to get to the brightness you want.
- ❌ It flashes brighter every time you turn it off. The half-press-from-on logic to change brightness happens at the initial half-press. When you do a full-press to turn the light off, it briefly flashes brighter because the first part of a full-press is a Half-press. Wuben should change the firmware so the brightness change happens when you release a half press.
Ultimately this UI is clunky. I think Wuben would have been better served putting a standard single-stage e-switch and industry standard UI on the white light channel. Or they could have set up the two-stage switch to work like a forward clicky that always starts on low. That way you could quickly half-press to cycle to the mode you want and then full click to lock it on.
Emitter & Beam
The white LED is a Luminus SST-36F in 5000K, ~62CRI and ~0.0100 (greenish) tint. It’s an OK choice for efficiency, which is important with such a small battery. It’s not the prettiest though. There’s also a UV LED and a green laser, which work well. The UV does not have a visible-light filter (most competitors don’t either).


The main beam is on the floody side. It’s got some artifacts and the spill isn’t round. It’s not the cleanest beam but it’s functional.
In the beamshots below, camera settings are fixed and the wall is ~2.5M away.


In the beamshots below, camera settings are as similar as possible, the basketball goal to the right of the hotspot is 39M away, and the power pole in the center is 185M away.


Mode Chart
Disclaimer: All of my measurements are taken at turn-on. Lumen measurements were taken on a Texas Ace 3.5″ Lumen Tube. A candela measurement was taken at 10 meters with an Opple Light Master III on the highest brightness, and other candela figures were calculated relative to that. CRI, CCT, & DUV data were taken for each mode from a few feet away at the center of the hotspot with the Opple Light Master and Waveform DUV Calculator. Runtime tests were performed with the Ceilingbounce app on my smartphone. These tests were performed with a fully charged included battery unless otherwise specified. I cannot measure moonlight directly, so moonlight readings are calculated based on the brightness relative to the next-lowest mode. None of this is professional equipment, so take these measurements with a grain of salt.

The official specs are above, followed by my own measurements below.
| Level | Lumens | Candela | Throw (Meters) | CRI (Ra) | Color Temp. (K) | DUV (Tint) |
| Turbo | 1300 | 4200 | 130 | 62 | 4640 | 0.0104 |
| High | 360 | 1200 | 68 | 61 | 4640 | 0.0117 |
| Medium | 150 | 490 | 44 | 61 | 4600 | 0.0120 |
| Low | 50 | 160 | 25 | 62 | 4590 | 0.0120 |
| Moonlight | 2.1 | 7 | 5 | 62 | 4580 | 0.0126 |
NiMH: The only brightness difference between the included battery and four Eneloop AAA’s is that Turbo drops to 850lm on AAAs.
Runtime

Performance: Peak brightness, sustained brightness, and overall runtime are on-par for this class of light. The AAA runtime is actually better than I expected. Turbo time is pretty poor at ~20 seconds before it starts to step down.
Thermal Management: My Turbo and Turbo Cooled tests are virtually identical, so there’s no active thermal throttling here, just timed stepdowns. That means performance will be consistent, but not optimized for ambient temperature.
LVP (Low Voltage Protection) is present and works well. It doesn’t rely on the battery having a protection circuit. The light will shut off when the battery is practically empty, but it can be temporarily re-activated in an emergency.
Driver
The driver is likely a buck circuit since it can accept up to ~6V from four AAAs to drive ~3V LEDs. The laser and UV channels may have different drive circuitry.

Voltage immunity is good/average. It maintains most of the Turbo brightness down to ~25% charge, and all the other modes are flat down to 25% charge or less. That’s exactly what I want because it shows the components are high quality and they’re being pushed hard for great performance.
PWM: No PWM is visible to my eyes or camera, nor audible to my ears.
Parasitic Drain: I can’t measure drain with the included battery, but I did measure 39 microamps on AAAs. Assuming it’s the same with the included battery, that will take ~3.5 years to drain the included battery.
Batteries & Charging

The battery included is a proprietary and user swappable 1200mAh Li-ion pack, about the size of four AAAs. Coincidentally, the light can also accept four AAAs! The tailcap is hinged and has a lockable latch to keep it closed. This is an improvement over the built-in batteries used by virtually all competitors. However, when the included battery wears out, I think it’s unlikely you’ll be able to find a replacement. Then you’ll be stuck using AAAs and unable to use the USB-C charging. That’s still a compromise compared to lights with standardized cylindrical li-ion cells.


Charging is facilitated by a USB-C port on the side of the light. It’s hidden behind a sliding door with a great, fidgety action. Charging takes about 90 minutes. It works while plugged in, even without a battery, limited to the lower 3 levels. Naturally, with such a small battery there is no powerbank function.
The battery indicator is located on the side and glows for a few seconds after you turn the light on. I prefer four-diode indicators, but this four-color/pattern setup works ok. Here’s what the colors mean:
| State | Color/Pattern | Meaning |
| Charging | Blue | Full |
| Charging | Red | Charging |
| Unplugged | Blue | 80% |
| Unplugged | Blue Blinking | 50-80% |
| Unplugged | Red | 20-50% |
| Unplugged | Red Blinking | <20% |
Carry & Ergonomics

Ergonomics are fair. I can reach all the controls in a reverse grip without having to move the light around too much. It does feel blockier & bulkier than a cylindrical light though, and there’s no grip that really feels like the “correct” way to hold it.

Clip score: 6.5/7
- Attachment doesn’t pop off or rotate accidentally✅
- Can be removed and bent back into shape if needed✅
- Bezel-down carry is at a reasonable depth✅/❌
- It’s not un-reasonable, but it leaves more of the light sticking out than I’d like. They could have made it loopover-style to make it sit lower without interfering with the tailcap. Half point.
- Landing location is smooth, not on the charging port, and away from the bezel✅
- Mouth/ramp and loop(s) are wide enough for pants material✅
- Finish is durable✅
- No bidirectional clips without reason✅
Lanyard: The included USB C-to-C cable doubles as a wrist lanyard by clipping both USB-C ends into a tethered clasp. The only place to attach a lanyard is to the pocket clip.
Magnet: There is no magnet.
Competition
Here are some lights in the same class and how they compare.
Olight ArkPro (& Ultra): built-in-battery alternative
- more expensive
- built-in higher-capacity battery
- worse voltage immunity
- floodlight+laser+UV+spotlight
- similar floodlight brightness
- better battery indicator
- much further throw using the spotlight
- much better user interface & switches
- better clip & ergonomics
- smaller overall and feels slimmer in the pocket
- magnetic tailcap
- This is what I’d buy if I wanted the best flat EDC light experience.
Wurkkos HD01 Pro: budget alternative
- about half the price
- similar performance
- the same functions (white, laser, and UV) plus an RGBW side light
- built-in battery
- no rotary channel selector
Acebeam K1: cylindrical alternative
- about half the price
- not quite as bright, more throw
- cylindrical shape with flared head
- significantly smaller overall, just a bit thicker at the head
- same functions (white, laser, and UV)
- similar rotary selector interface
- single mechanical tail switch
- includes a USB-C rechargeable 14500 battery and can also accept a AA
- This is what I’d buy if I wanted white+laser+UV and were really concerned about battery sustainability.
This section is not comprehensive. If I didn’t include a particular light here, it doesn’t mean it’s bad or doesn’t deserve to be here. I simply cannot list every possible competitor.
Conclusion
Props to Wuben for continuing to think outside the box to produce new and interesting lights. This is a novel light but I’m not sure it’s a good light. The battery solution is better than built-in, but still a huge compromise. The switches are nice but the UI is clunky. The light is flat, but it’s still much larger and blockier than competitors. It performs well and works fine, but it seems to me that most users would be better served by competitors.
Thanks to Wuben for sending me this light for review!


Thanks for the detailed breakdown!